Your Guide to the Canada PR Application from Nigeria
So, you're thinking about moving to Canada. It's a big decision, and the application process can seem overwhelming at first glance. But like any major project, the best way to tackle it is by breaking it down into manageable steps. The journey from Nigeria to Canadian permanent residency starts with a clear understanding of what’s required—from checking if you're even eligible, to gathering all your documents like passports and educational assessments, and finally, creating your online profile.
For Nigerians, this path is often competitive. That’s why a meticulously prepared application isn't just a good idea; it's absolutely essential.
Getting Real About Your Canadian Immigration Journey
Starting the Canada PR application from Nigeria means you need to be realistic from day one. This isn't just about filling in forms; it's about playing the long game with a solid plan. The first thing you absolutely must accept is that Canada's immigration system is constantly evolving. The loophole or strategy that worked for your uncle five years ago might be completely irrelevant today.
This means you need to work with current, accurate information. Forget the hearsay from WhatsApp groups and focus on official sources. Your success will ultimately boil down to three things: preparation, patience, and a deep understanding of how the system actually works.
Canada's Immigration Targets are Changing – Here's What it Means for You
One of the most significant factors influencing your chances is Canada's annual immigration targets. These numbers dictate how many people get invited to apply for permanent residence each year, and they've been adjusted recently.
For instance, the immigration plan for the 2025-2027 period shows a clear shift. In 2025, Canada aims to welcome 395,000 new permanent residents. That’s a major drop from the 485,000 target set for 2024. Fewer spots mean the competition among applicants from Nigeria and around the world is about to get much more intense. It's a good idea to learn more about how these immigration targets are changing so you can adjust your strategy.
The Bottom Line: With fewer invitations on the table, every single point in your profile now carries more weight. A strong profile is no longer just an advantage—it's a must-have.
This shift doesn't mean the dream is over. It just means you have to be smarter about your application. The Canadian government is now prioritising skilled workers for specific industries like healthcare and the skilled trades. If your profession falls into one of these categories, you might actually have a better shot than ever before.
Why Your Best Bet is to Start Right Now
When it comes to your Canada PR application, procrastination is your worst enemy. The process, from start to finish, can easily stretch over many months—sometimes even more than a year.
Just think about some of the early steps that are notorious time-sinks:
- Educational Credential Assessment (ECA): Getting your Nigerian university to send your transcripts directly to an organisation like WES can take ages. You need to get this ball rolling immediately. It's non-negotiable.
- Language Tests (IELTS/CELPIP): You have to book a test date, study for the exam, and then wait for the results. A high score can dramatically boost your chances, so you might even need to write it more than once to get the scores you need.
- Work Reference Letters: Chasing down previous employers in Nigeria for detailed reference letters that meet IRCC's very specific format can be a painfully slow back-and-forth process.
By starting now, you give yourself the breathing room to build the strongest profile possible without rushing and making silly, avoidable mistakes. A proactive approach is what puts you firmly in the driver's seat of your immigration journey.
How to Maximise Your CRS Score as a Nigerian Applicant
Before you even dream of uploading a single document, your entire focus needs to be on one thing: your Comprehensive Ranking System (CRS) score. Think of it as the JAMB score for Canadian immigration. It's the number that determines your rank in the Express Entry pool, and honestly, every single point counts. In this game, a high score is what separates you from the crowd and gets you that coveted invitation.
Your CRS score is a calculation of your potential to settle and succeed in Canada. Let's break down exactly where those points come from.
Deconstructing the CRS Points System
The system awards points for what immigration officials call "human capital" factors. For anyone applying from Nigeria, a few areas carry the most weight.
- Age: The sweet spot is between 20 and 29 years old—that's where you get the maximum points. After you hit 30, the points start to drop with each birthday.
- Education: A Master's degree or PhD from a Nigerian university gives your profile a serious boost. But here's the catch: you must get an Educational Credential Assessment (ECA) to prove it’s equivalent to a Canadian degree. Don't put this off.
- Language Skills: This is your low-hanging fruit and a massive opportunity. Acing your IELTS or CELPIP English test can add a huge chunk of points to your score. Don't treat it as just another requirement; it's one of the easiest ways to significantly improve your ranking.
- Work Experience: Your skilled work experience right here in Nigeria is valuable. You need at least one continuous year of paid, full-time work in a skilled job (NOC TEER 0, 1, 2, or 3) to even be eligible. The more years you have, the more points you get, up to a cap.
To see where you stand right now, it’s a good idea to get a clear picture by using a tool to check your potential score. The JapaChat Express Entry Calculator is a great starting point for this. It will show you your strengths and, more importantly, your weaknesses.
This handy infographic gives you an idea of the processing timelines you can expect. It really drives home why starting with a high score is so critical to move through the process smoothly.
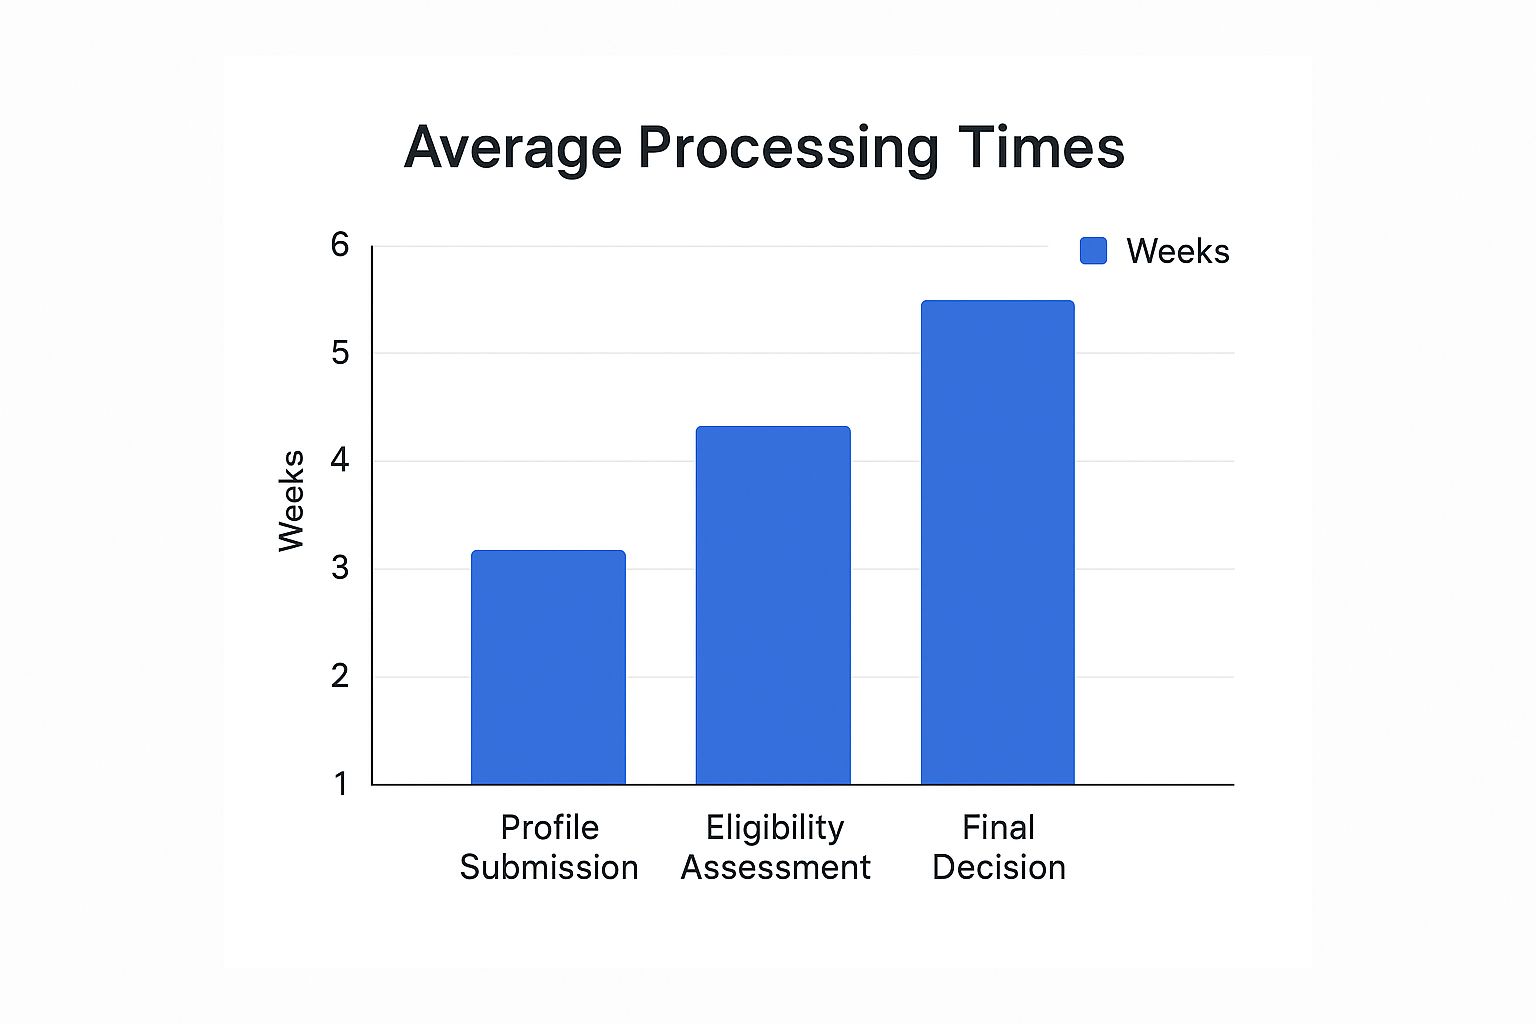
As you can see, the journey takes time. A strong profile from day one prevents unnecessary delays and keeps you competitive.
How CRS Points Are Awarded: Key Factors for Nigerians
To give you a clearer idea of how the points stack up, here’s a table showing the maximum points available for the core factors. This can help you see where to focus your energy.
| Factor | Maximum Points (With Spouse) | Maximum Points (Without Spouse) |
|---|---|---|
| Core Human Capital (Age, Education, Language, Experience) | 460 | 500 |
| Spouse or Partner Factors | 40 | N/A |
| Skills Transferability (Combination of factors) | 100 | 100 |
| Total Core Points | 600 | 600 |
This table doesn't even include the additional points available, but it highlights just how important your personal profile and your partner's profile can be.
Actionable Strategies to Boost Your Score
Okay, knowing the theory is one thing. Let's get practical. How can you actively increase that all-important number?
Ace Your Language Tests
I can't stress this enough—this is your golden ticket. You should be aiming for a Canadian Language Benchmark (CLB) level of 9 or higher in all four skills: reading, writing, listening, and speaking.
For the IELTS General Training test, that magic formula is scoring an 8 in Listening and a 7 in the other three sections. I know many people from Nigeria who have taken the test two or three times just to hit these scores. Trust me, the point difference it makes is often what gets an application selected.
Consider Further Education
If your score is still hovering below the latest draw cutoff, getting another credential could be a game-changer. A one-year postgraduate diploma or certificate on top of your Bachelor’s degree can add a substantial number of points to your education score.
Key Insight: Don't just focus on your own profile. If you have a spouse or common-law partner coming with you, their skills are your secret weapon. Their language ability and education can add valuable points to your total score. Make sure they also get their ECA done and write the IELTS exam.
Secure a Provincial Nomination
This is, without a doubt, the most powerful tool in your arsenal. Getting a nomination from a Provincial Nominee Program (PNP) instantly adds 600 extra points to your CRS score. That's a near-guarantee you'll receive an Invitation to Apply (ITA).
Many Nigerian professionals in fields like tech, healthcare, and the trades have successfully used PNPs in provinces like Alberta, Saskatchewan, or Ontario to land their PR. Do your research and see which provinces are crying out for someone with your skills.
While your Express Entry profile is the main event, don't overlook your professional presence online. Taking the time to work on creating a professional LinkedIn profile can help you connect with Canadian employers. A valid job offer supported by a Labour Market Impact Assessment (LMIA) is worth its weight in gold, adding either 50 or 200 points to your score.
Getting Your Documents Ready: The Make-or-Break Stage

Alright, this is where the theory stops and the real work begins. Gathering your documents for the Canada PR application is, without a doubt, the most demanding part of this entire journey. For us in Nigeria, it comes with its own unique flavour of challenges.
Trust me when I say that one tiny missing detail or a document that isn't formatted exactly right can lead to heartbreaking delays or, worse, an outright refusal. So, let’s treat this checklist as your personal battle plan. We're going to go beyond just listing documents and get into the nitty-gritty of what it actually takes to get them in Nigeria.
The ECA and University Transcript Saga
First up, your Educational Credential Assessment (ECA). This is non-negotiable. It’s the official report that proves your degree from a Nigerian university is on par with one from Canada. The biggest hurdle here? Often, it's your own alma mater.
Let's be real: many Nigerian universities can be painfully slow when it comes to sending transcripts to assessment bodies like World Education Services (WES). You simply can't afford to be patient. The minute you decide you're serious about this PR goal, you need to start the transcript request process.
Here's a pro-tip from someone who's seen it all: if you have a friend, cousin, or any trusted contact near your old university, ask them to physically go to the transcripts office for you. One personal visit can achieve more than a month of unanswered emails and calls. And yes, be prepared for some "administrative fees" to speed things up. It’s often a necessary evil in our system.
How to Write an Employer Reference Letter That Actually Works
This is a big one. So many Nigerian applications stumble right here. A simple letter saying "This person worked here from Date A to Date B" is completely useless for IRCC (Immigration, Refugees and Citizenship Canada). They have very specific, strict requirements.
Your reference letter needs to be detailed and look official. Here’s exactly what it must include:
- Official Letterhead: It has to be printed on the company’s letterhead, showing their full address, phone number, and email.
- The Right Signature: Your direct supervisor or an HR manager must sign it. Their name and official title must be typed out clearly below their signature.
- Your Key Details: It needs to state the exact dates you were employed, your job title, your annual salary plus any benefits, and the number of hours you worked per week.
- Your Duties (The Most Important Part): It must have a list of your main duties. Do not copy and paste a generic job description from the internet. Your duties should be written to reflect what you actually did, while still aligning with the key responsibilities listed for your National Occupational Classification (NOC) code.
For instance, if you were a Software Developer at a tech firm in Lagos, don't just say you "developed software." Get specific. "Wrote and maintained clean, efficient code for client-facing mobile applications using Java and Kotlin," or "Collaborated with a team of five developers to troubleshoot and debug backend systems, reducing server downtime by 15%." See the difference?
Showing Them the Money: Your Proof of Funds
Your Proof of Funds (POF) is another critical piece of the puzzle. You have to prove you have enough cash to take care of yourself and your family when you land in Canada. These funds must be in your name or your spouse's name—no one else's.
And yes, the funds can absolutely be in your Nigerian bank account. There's no need to rush to open a dollar account just for this. What you do need is an official letter from your bank that clearly states:
- Your account numbers.
- The date each account was opened.
- The current balance in each account.
- The average balance over the last six months.
Crucially, this letter must also show the Canadian Dollar (CAD) equivalent of your total funds, calculated using the exchange rate on the day the letter is issued. A regular bank statement won’t cut it; you need this specific, detailed letter. To stay on top of the latest requirements, it’s a good idea to consult a comprehensive guide on the https://blog.japachat.com/canada-permanent-residence-application/ process.
Insider Tip: Avoid dumping a large sum of money into your account right before you request this letter. It looks suspicious and can raise red flags for the immigration officer reviewing your file. They want to see funds that have been stable and building up over several months.
Don't Forget Your Police Certificates
Finally, you’ll need a police clearance certificate from Nigeria. You will also need one from any other country where you've lived for six months or longer since you turned 18.
Here in Nigeria, you get this from the Nigeria Police Force Criminal Investigation Department (CID). The process itself is fairly straightforward, but it can take time. Apply for it well in advance to save yourself from last-minute panic. Make sure the final document is scanned clearly. A blurry or incomplete certificate is an easy excuse for an officer to send your application back, and that's a delay of months you just don't need.
Creating Your Express Entry Profile: Your Digital Handshake
Alright, you've got your documents sorted. Now for the main event: creating your Express Entry profile. This is where you officially step into the ring and introduce yourself to Immigration, Refugees and Citizenship Canada (IRCC).
Think of the IRCC portal as more than just a data entry form. It's your first handshake with the Canadian government, and every detail you provide paints a picture of who you are. This isn't the place for guesswork.
I’ve seen too many brilliant Nigerian candidates get screened out right at this stage because of small, completely avoidable mistakes. Let's make sure that doesn't happen to you.
Getting Started on the IRCC Portal
Your first stop on the IRCC website is the "Come to Canada" tool. It’s a quick questionnaire to see if you even qualify for one of the main immigration programmes. If you get the green light, the system will give you a personal reference code.
Treat that code like gold. You’ll need it to create your official IRCC secure account and actually start building your profile. From there, it's a step-by-step process where you'll input the details you’ve already gathered:
- Personal Details: Name, age, family info, etc.
- Contact Info: Use an email you check obsessively. All official communication will land there.
- Education: Time to plug in that ECA report number.
- Work Experience: A detailed breakdown of your professional history.
- Language Scores: Your IELTS or CELPIP results.
Go slow and be meticulous. A simple typo in your name or passport number can create a world of trouble down the line. If you want a more detailed breakdown of this first phase, you can learn more about creating an Express Entry profile in our other guide.
The #1 Mistake: Messing Up Your Work Experience Calculation
This is where so many applicants from Nigeria get it wrong. You can only claim skilled work experience that was continuous, paid, and happened within the last 10 years. And what does IRCC consider "skilled"? Your job must fall under the National Occupational Classification (NOC) TEER 0, 1, 2, or 3.
That NYSC placement? It probably doesn't count unless your Place of Primary Assignment (PPA) was a skilled role and you got a proper reference letter detailing your duties. Don't even think about including unpaid internships or exaggerating your roles. The visa officers are experts at sniffing out inconsistencies, and misrepresentation will earn you a five-year ban from applying. Just be honest and stick to the facts.
Crucial Tip: When adding up your years of experience, remember that IRCC defines full-time as at least 30 hours per week. If you worked part-time, say 20 hours a week, for two years in a qualifying job, that only counts as one year of full-time experience in their books. Getting this calculation right is fundamental.
Choosing Your NOC Code: Don't Get This Wrong
Picking the correct National Occupational Classification (NOC) code is easily the most critical decision you'll make here. This five-digit code is your professional identity in the eyes of Canadian immigration. A mismatch is one of the top reasons for refusal, period.
Don't just pick a job title that sounds like yours. You need to go to the official Canadian government website, find the NOC code you think fits, and read the main duties listed. Your own experience must align with the majority of those listed duties.
Here’s a real-world Nigerian scenario:
Let's say you're a "Relationship Manager" at a bank in Lagos. It's tempting to look for a generic "manager" code. But if your daily tasks involve assessing loan applications, advising clients on investments, and managing financial portfolios, your actual duties might be a perfect match for NOC 11101 – Financial advisors.
The job title on your business card matters far less than the work you actually do. Nailing this from the very beginning is essential for building a solid Canada PR application.
So You Got an ITA? Here's Your 60-Day Game Plan

This is it. The email from IRCC finally hits your inbox, the subject line reading "Invitation to apply for permanent residence." It’s a feeling like no other. Go ahead, celebrate! But once the excitement settles, it's time to switch into high gear. The clock is now ticking, and you have exactly 60 days to submit a flawless, complete application.
Let's be clear: this isn't a drill. That 60-day deadline is non-negotiable. This isn't the time to start scrambling for documents you should have sorted out months ago. This phase is purely about execution—carefully uploading everything, double-checking every detail, and getting those fees paid.
Let's walk through how to get this done without any last-minute panic.
The Final Push: Uploading and Polishing Your Application
When you log back into your IRCC portal, you'll see a new section has opened up for your final Canada PR application. It will present you with a personalised document checklist, all based on what you declared in your Express Entry profile. Each required document has its own dedicated upload slot.
Your main task here is to make sure every single document is scanned clearly, in high resolution, and labelled properly. Put yourself in the visa officer's shoes: if a document is blurry, has parts cut off, or is just plain difficult to read, it could get your entire application rejected.
Here’s a quick sanity check before you upload anything:
- Review Every Single File: Open each PDF one last time. Is it the correct, complete, and final version? It's shockingly easy to accidentally upload an old draft of a reference letter or a partial bank statement.
- Check File Size and Format: The portal has a file size limit, usually around 4MB per file. You might need to use an online PDF compressor for bulkier files. Be careful to maintain readability. Stick to the required formats, which are almost always PDF.
- Organise Translations: Any document not in English or French must be uploaded with a certified translation. This is common for things like birth certificates issued in a local Nigerian language. Make sure the translation and the original are submitted together.
Filling in the Gaps: The Final Application Forms
Beyond just uploading documents, you’ll also have to fill out several detailed online forms. This is where IRCC digs deeper into your personal history, asking for things like your travel and address history for the last 10 years.
A Quick Tip for Nigerians: Your travel and address history needs to be perfect. Don't estimate or guess. A small inconsistency between your forms and your supporting documents can raise a red flag. If you've travelled a lot, sit down with your passport and map out every single trip. Can't remember the exact street number of a place you lived eight years ago? Do your best to find it. Accuracy is everything.
You'll also have to declare any previous visa refusals from any country. Please, be completely honest here. Hiding information is considered misrepresentation, a serious offence that can get you banned from applying to Canada for five years. It's not worth the risk.
Tackling the Payment Hurdle from Nigeria
This is often the final, and most frustrating, step for many Nigerian applicants. You'll need to pay two main fees: the Application Processing Fee and the Right of Permanent Residence Fee (RPRF). While you can pay the RPRF later, paying it all upfront can sometimes speed up the process.
The big problem? Many Naira-denominated bank cards have tight international spending limits or get blocked by fraud detection systems when you try to make a large payment in Canadian Dollars.
Here are a few workarounds that people have successfully used:
- Use a Domiciliary Account Debit Card: This is your best option. If you have a dollar, pound, or euro account in Nigeria, the card linked to it is built for these kinds of international transactions.
- Ask a Friend or Relative Abroad: This is a very common and reliable method. You can transfer the Naira equivalent to someone you trust in the US, UK, or Canada, and they can easily make the payment for you with their card.
- Try a FinTech/Virtual Card: Some services that offer virtual dollar cards can bypass the restrictions placed on traditional Nigerian bank cards. Do your research to find a reliable one.
Whatever you do, don't leave the payment until the 59th day. Card declines and transaction issues are common. You don't want to miss your hard-earned opportunity over a payment problem. Take a deep breath—you're at the finish line.
So, You've Submitted Your Application. What Now?
Hitting that "submit" button on your Canada PR application feels like a massive weight off your shoulders. The months of gathering documents, filling out forms, and double-checking every detail are finally over. But, as one chapter closes, another—the waiting game—begins.
Don't just sit back and chew your nails, though. While Immigration, Refugees and Citizenship Canada (IRCC) gets to work on your file, there are a few crucial things you need to handle on your end. Knowing what's coming next can make the whole process feel a lot less mysterious.
The first piece of good news usually arrives in your inbox as the Acknowledgement of Receipt (AOR). This email is simply IRCC's way of saying, "We've got your application, and it's officially in our system." It will also contain your unique file number, which is your key identifier from here on out.
Your First Big Tasks: Biometrics and Medicals
Soon after the AOR lands, you’ll get a Biometric Instruction Letter (BIL). This is a big one, and it’s not a suggestion—it's a requirement. You'll need to book an appointment to get your fingerprints and photograph taken at one of the official Visa Application Centres (VACs) in Nigeria, either in Lagos or Abuja. My advice? Book this the moment you get the letter. Those appointment slots disappear faster than you can say "Japa."
At the same time, you’ll need to schedule an upfront medical exam. You can't just pop into your local clinic for this. It has to be done by an IRCC-approved "panel physician" in Nigeria. You can find a list of them on the official IRCC website. The doctor won't hand you your results; they'll be sent directly and securely to IRCC.
A Quick Tip from Experience: Hold onto every single receipt and confirmation slip from your biometrics and medical appointments. While everything is submitted electronically, having your own paper trail is a lifesaver if there's ever a technical glitch or a question about your file.
Staying Updated and Handling Follow-Up Requests
With those initial hurdles cleared, the real waiting begins. You can keep an eye on your application's progress by logging into your IRCC secure account. The status updates can be frustratingly slow and sometimes a bit generic ("In Progress" can mean a lot of things!), so try not to refresh the page a hundred times a day.
It's also quite normal for an immigration officer to reach out for more information. They might need a clearer scan of your birth certificate, an updated bank statement for your Proof of Funds, or clarification on your work experience. If you get a request like this, act on it immediately. A quick, complete response shows you're on top of things and helps keep your Canada PR application moving smoothly.
These follow-ups are just part of the thorough vetting process. The Canadian government is looking for people who can successfully integrate and contribute, especially as the country's population continues to evolve.
For instance, while Canada had 2,959,825 non-permanent residents recorded at the start of 2025, the distribution isn't even. Some provinces like Ontario and British Columbia actually saw their populations dip slightly, while places like Alberta grew significantly. This kind of data, which you can explore further on the Statistics Canada website, shows how immigration policies are constantly adapting to national and regional needs.
Your Top Questions Answered
Applying for Canadian PR from Nigeria often brings up a unique set of challenges and questions. Let's walk through some of the most common ones I hear from applicants, so you can navigate these specific hurdles with confidence.
How Much Money Do I Really Need to Show in Naira?
This is probably the most asked question, and for good reason. The amount you need for your Proof of Funds (POF) isn't fixed; it changes based on how many family members are in your application. The first thing you should always do is check the latest figures directly on the official IRCC website.
You don't need to convert your money to Canadian dollars or open a foreign account. Your funds can stay right in your Nigerian bank. However, the letter your bank provides must show the Canadian dollar (CAD) equivalent of your balance, calculated using the exchange rate on the very day the letter is printed. It also needs to show your average balance over the past six months.
A word of caution: IRCC is very wary of large, unexplained deposits right before you get your bank statement. They want to see that the money is genuinely yours and has been stable over time. Avoid last-minute "borrowing" from family just to inflate your account balance—it's a major red flag.
Does My NYSC Year Count as Work Experience?
This is a tricky one, and the official answer is a classic "it depends." For your work experience to count towards your Express Entry profile, it has to tick a few specific boxes:
- It must be paid work.
- It must be full-time (at least 30 hours a week) or the equivalent in part-time hours.
- The job duties must align with a skilled occupation, specifically NOC TEER 0, 1, 2, or 3.
So, if your NYSC posting was a skilled role and you received a regular stipend, it could qualify. The absolute key is the reference letter you get from your Place of Primary Assignment (PPA). A generic letter stating you worked there is useless. You need a detailed document that clearly lists your responsibilities, allowing an immigration officer to match them to the official NOC description.
What are the Biggest Mistakes Nigerians Make?
From my experience, many applications from Nigeria get delayed or even rejected because of simple, avoidable errors. One of the most common pitfalls is a weak or incomplete employer reference letter. Submitting a letter that's missing crucial details like your specific job duties, salary, and weekly hours is a sure way to get a request for more information, or worse, a refusal.
Other frequent slip-ups include choosing the wrong National Occupational Classification (NOC) code for your experience and uploading documents that are poorly scanned, blurry, or have pages missing. The golden rule is to be meticulous. Go through every single document requirement on the IRCC checklist twice. In the canada pr application game, attention to detail is your best friend.
Planning your move can feel overwhelming, but you don't have to do it alone. JapaChat is Nigeria's AI immigration expert, designed to give you instant, accurate answers for your journey. Get started with personalised guidance today at https://japachat.com.
Leave a Reply