Canada Tourist Visa Requirement for Nigerians
At its heart, the main Canada tourist visa requirement for Nigerians is simple: you must prove you are a genuine visitor who will absolutely leave Canada when your trip is over. This means demonstrating you have strong ties to Nigeria, enough money to fund your trip, and a clear, believable reason for visiting.
Your entire application's success hinges on one thing: convincing the visa officer you have compelling reasons to return home to Nigeria.
Understanding the Canada Visa Hurdle from Nigeria
Dreaming of seeing the CN Tower light up the Toronto skyline or hiking through the stunning landscapes of Banff is the easy part. For many Nigerians, the visa application itself can feel like a massive, confusing obstacle. The big question is always, "What does Immigration, Refugees and Citizenship Canada (IRCC) actually want to see to approve my application?"
It helps to understand why applications from Nigeria get such close scrutiny. In recent times, Canadian visitor visa applications from Nigeria have faced a tough challenge, with refusal rates reportedly climbing past 61%, according to Canadian Immigration Minister Marc Miller. This isn't random; it reflects Canada's firm stance on preventing people from overstaying their visas.
This guide is here to be your practical roadmap, cutting through the noise and confusion. We'll break down exactly what the IRCC expects from a Nigerian applicant, so you can start your application with confidence.
Core Documents You Cannot Ignore
Think of your application as building a legal case, where you are the main witness and your documents are the evidence. Forgetting even one of these crucial pieces of paper can result in a swift refusal, no questions asked.
Before we get into the specifics, it's worth noting that preparing for the visa is just one part of the journey. To get a bigger picture of what to expect, you might find it helpful to read a comprehensive guide to life in Canada.
The goal isn't just to dump a pile of documents on the visa officer. It's to tell a clear, consistent, and believable story about your trip and why you will definitely return to Nigeria. Every single document must support that story.
Here's a look at the absolute must-haves for your application.
Core Documents for Your Canada Visitor Visa Application
This table acts as your essential checklist. These are the foundational documents every Nigerian applicant needs to gather to build a strong case for their visitor visa.
| Document Category | Specific Items Required | Purpose |
|---|---|---|
| Identity & Travel | Valid Nigerian International Passport, Passport Photographs | To confirm who you are and that you're legally able to travel. |
| Purpose of Visit | Flight Itinerary, Hotel Bookings, Invitation Letter | To prove you have a clear and genuine reason for visiting. |
| Financial Stability | 6-Month Bank Statements, Payslips, Employment Letter | To show you can afford your trip without needing to work in Canada. |
| Ties to Nigeria | Proof of Employment, Property Documents, Family Details | To convince the officer you have strong reasons to come back home. |
Having these documents in perfect order is your first—and most important—step toward getting that visa stamp.
Proving Strong Ties to Nigeria

This, right here, is the absolute heart of your application. Every single document you submit has one job: to convince the visa officer that you will return to Nigeria after your trip. Proving you have strong ties to your home country is all about showing them you have a life, responsibilities, and connections you simply wouldn't walk away from.
Think of it like this: the visa officer is a risk assessor. They need to be completely satisfied that your visit is temporary. Your documents are the evidence that proves your life—your job, your family, your assets—is firmly planted in Nigeria. This is what assures them you'll be back.
Frankly, this is where most applications from Nigeria fall apart. It's not enough to just say you'll return; you have to prove it with solid, undeniable evidence.
Building Your Case with Concrete Evidence
You need to build a compelling story across three key areas: your job, your finances and property, and your family. A strong application doesn’t just have one piece of evidence; it has several from each category, all working together to paint a clear picture of a stable life in Nigeria.
The goal is to show deep roots that a short holiday in Canada won't sever.
For instance, a formal letter from your manager at a reputable company in Lagos carries much more weight than simply stating you're employed. It proves you have a career to come back to. In the same way, providing documents showing you own property in Abuja or run a registered business creates a powerful anchor to your life back home.
The strongest proof of ties is never just one thing. It's a combination of documents that, together, tell a story of stability. A good job, family commitments, and property ownership collectively create an undeniable reason for your return.
Let's break down the specific types of proof that really work.
Key Documents to Prove Your Nigerian Roots
To make your application as convincing as possible, you need to focus on clear, official documents. This isn’t about throwing a pile of papers at them; it's about providing quality, relevant proof.
- Employment Proof: Get an official letter from your employer. It must state your position, salary, how long you've worked there, and confirm that your leave for the trip has been approved. Back this up with recent payslips.
- Property Ownership: If you own land or a house, this is a huge plus. Provide the Certificate of Occupancy (C of O) or Deed of Assignment. It's powerful proof of a major, long-term investment in Nigeria.
- Family Commitments: You need to show you have dependents. Birth certificates for your children and proof of their school enrolment in Nigeria are perfect. If you're a caregiver for elderly parents, a letter from their doctor can also strengthen your case.
- Business Ownership: For business owners, this is your time to shine. Provide your Corporate Affairs Commission (CAC) registration documents, your business's bank statements, and recent tax clearance certificates.
Each one of these documents adds another layer to your story, making it crystal clear to the visa officer that your trip to Canada is exactly what you claim it is—a temporary visit.
Meeting the Proof of Funds Requirement
Once you’ve established strong ties to Nigeria, the next big hurdle is proving you can actually afford your trip. The Canada tourist visa requirement for proof of funds isn't just about showing a fat bank balance. It’s about telling a clear story of your financial stability and where that money came from.
Think of your bank statement as a financial biography. The visa officer is reading it to find a consistent, believable narrative, not a sudden, unexplained plot twist. A huge lump sum that appears out of nowhere right before you apply is a massive red flag. They want to see a history of regular income and savings building up over time.
What Does "Sufficient Funds" Really Mean?
There's no official magic number set in stone by the Canadian government. The real test is whether you can prove you can cover every single expense for your trip without the temptation of working illegally in Canada. This means your flight, accommodation, food, transport, and any tourist activities.
As a practical guideline, aim to have around CAD $1,200 to $1,500 for each month you plan to stay, and that's on top of what you need for your return flight ticket.
For a two-week trip, a single person might need to show the equivalent of ₦4,000,000 to ₦6,000,000, give or take, depending on the exchange rate and how lavish your travel plans are. The golden rule here is transparency.
A strong financial profile tells a story of consistency. Your six-month statement from a Nigerian bank like GTBank or Zenith should clearly show your salary landing regularly, not a mysterious lump sum that just showed up last week.
To paint a clear and convincing financial picture, you'll need to gather a few key documents:
- Six-Month Bank Statement: This has to be the official statement from your bank. It needs to show your regular salary deposits, a pattern of savings, and a healthy closing balance.
- Payslips: Back up your bank statement with your payslips from the last six months. They should match the salary deposits perfectly.
- Letter of Employment: An official letter from your employer is crucial. It needs to state your position, how long you've worked there, and your salary to confirm the source of your income.
If you run your own business, you'll need to provide your business registration documents (CAC), the business's bank statements, and tax clearance certificates. For a really detailed breakdown of what documents work best, check out this guide on the proof of funds for Canada.
Using a Sponsor for Financial Support
What happens if your personal funds don't quite meet the mark? You can absolutely use a sponsor, like a close family member in Nigeria or someone you know in Canada. But be warned: this path requires meticulous documentation to be successful.
Your sponsor can't just promise to support you; they have to prove, beyond a doubt, that they have the financial muscle to do so and have a genuine relationship with you.
Here’s what you'll need from them:
- A Letter of Support: This is a formal letter, written and signed by your sponsor. It must clearly state their relationship to you, why you're visiting, and make a firm promise to cover all your expenses during your stay.
- Proof of Their Financial Stability: They need to provide their own financial story. This includes their bank statements for the last six months, a letter from their employer confirming their salary, and their recent tax documents (like a Notice of Assessment if they are in Canada).
- Proof of Their Status in Canada: If your sponsor is in Canada, they must include a copy of their Canadian passport, Permanent Resident card, or other proof of legal status.
Getting these documents in order shows the visa officer that your application is transparent and your financial backing is solid, which can make a huge difference in getting that approval.
Navigating the Online IRCC Application Portal

Alright, you've gathered all your paperwork. Now it’s time to move online and face the technical side of the Canada tourist visa requirement—the application itself. For Nigerian applicants, everything happens through the official Immigration, Refugees and Citizenship Canada (IRCC) secure portal. It's built to be user-friendly, but like any government website, it has its quirks.
Think of the IRCC portal as your official file with the Canadian government. Every document you upload and every piece of information you enter is logged. That’s why getting it right the first time is so important for a headache-free process. It all starts with paying close attention to the small stuff.
Your first step is creating a secure IRCC account. This account becomes your command centre—it's where you'll fill out your forms, upload documents, pay the necessary fees, and get all updates on your application's status. It's your direct link to Canadian immigration.
Completing the Application Forms Correctly
Once you're logged into your new account, the system will walk you through several digital forms. The main one you'll be dealing with is the Application for Visitor Visa (Temporary Resident Visa), officially known as form IMM 5257. This is where tiny mistakes can cause major setbacks, so precision is key.
A very common stumbling block is the travel history section. Don't be tempted to leave anything out or be vague. You need to list every single international trip you've taken over the past ten years. Even a quick trip to Cotonou or Accra counts, and forgetting one could be flagged as a misrepresentation.
Another section that trips people up is personal details. Your name, date of birth, and passport number must match your Nigerian international passport to the letter. Even a small typo can lead to long delays or an outright refusal. I can't stress this enough: double-check, then triple-check before submitting.
Attention to detail is your best friend on the IRCC portal. A tiny mistake, like a typo in your date of birth or a missing travel date, can create a big problem for your application. Treat every field as if it's the most important one.
Paying Fees and Booking Your Biometrics
After you've reviewed your forms until you're sure they're perfect, you'll hit submit and move on to the final stages: payment and biometrics. You have two fees to pay online, right on the portal:
- Application Fee: This is the charge for processing your visa application.
- Biometrics Fee: This covers the cost of taking your fingerprints and photograph.
Both fees are listed in Canadian Dollars (CAD), so you’ll need a debit or credit card that's enabled for international transactions. Don’t forget to factor in the current Naira to CAD exchange rate when you're budgeting.
As soon as your payment goes through, you’ll receive a Biometric Instruction Letter (BIL). This is the document you need to book an appointment at an official Visa Application Centre (VAC). In Nigeria, these are located in Lagos and Abuja. Once you've given your biometrics, your part is done. From there, you can monitor your file's progress by using effective visa application tracking methods. Now, the waiting game begins.
Avoiding Common Visa Refusal Reasons
Getting a visa refusal is a crushing blow, but understanding why it happened is the key to turning that rejection into an approval on your next try. The good news is that most refusals are avoidable. They often boil down to a few common mistakes that Nigerian applicants, in particular, tend to make.
If you can get ahead of these issues before you hit "submit," you'll dramatically boost your odds. The big three reasons for refusal are almost always the same: an unclear purpose of visit, shaky proof of funds, and weak ties to Nigeria. The visa officer needs to see a clear, believable story, and any doubt in these areas is an immediate red flag.
Let's break down how to sidestep these traps.
Strengthening Your Purpose of Visit
One of the fastest routes to a "no" is being fuzzy about your travel plans. Just writing "tourism" on your application is simply not going to cut it. You have to prove to the visa officer that you have a real, well-researched, and concrete plan.
Instead of a weak statement like, "I plan to visit Toronto for two weeks," you need to provide a detailed, day-by-day itinerary. Think about it this way: "Day 1-3: Arrive at Toronto Pearson, check into the [Hotel Name], visit the CN Tower and Ripley's Aquarium. Day 4: Take a pre-booked tour to Niagara Falls." This level of detail shows your trip is genuine and you've put serious thought into it.
The difference between a weak and a strong application often comes down to the details. A solid travel plan, backed by things like hotel bookings and tour reservations, proves you're a serious tourist, not someone with vague or hidden intentions.
To get a better handle on what causes rejections, it’s worth reading up on the most common reasons for visa refusal. Knowing this ahead of time helps you spot and fix potential weak spots in your own application before they become a problem.
From Weak Points to Strengths
Turning a weak application into a strong one is all about swapping out vague claims for solid proof. It's about showing, not just telling. The table below gives you a clear picture of how to upgrade those common weak points to meet the Canada tourist visa requirements.
Weak vs Strong Application Elements
| Application Element | Weak Example (High Refusal Risk) | Strong Example (Better Approval Chance) |
|---|---|---|
| Purpose of Visit | "I want to see Canada." | A detailed 10-day itinerary with hotel bookings and flight reservations attached. |
| Proof of Funds | A large, unexplained lump sum deposited into your bank account last week. | Six months of bank statements showing a consistent pattern of salary deposits and steady savings. |
| Ties to Nigeria | Simply stating you have a job, with no official documentation to back it up. | An employment letter, 6 months of payslips, a leave approval letter, and perhaps a property deed. |
As you can see, the strong examples provide undeniable evidence that supports your claims, leaving very little room for doubt in the visa officer's mind.
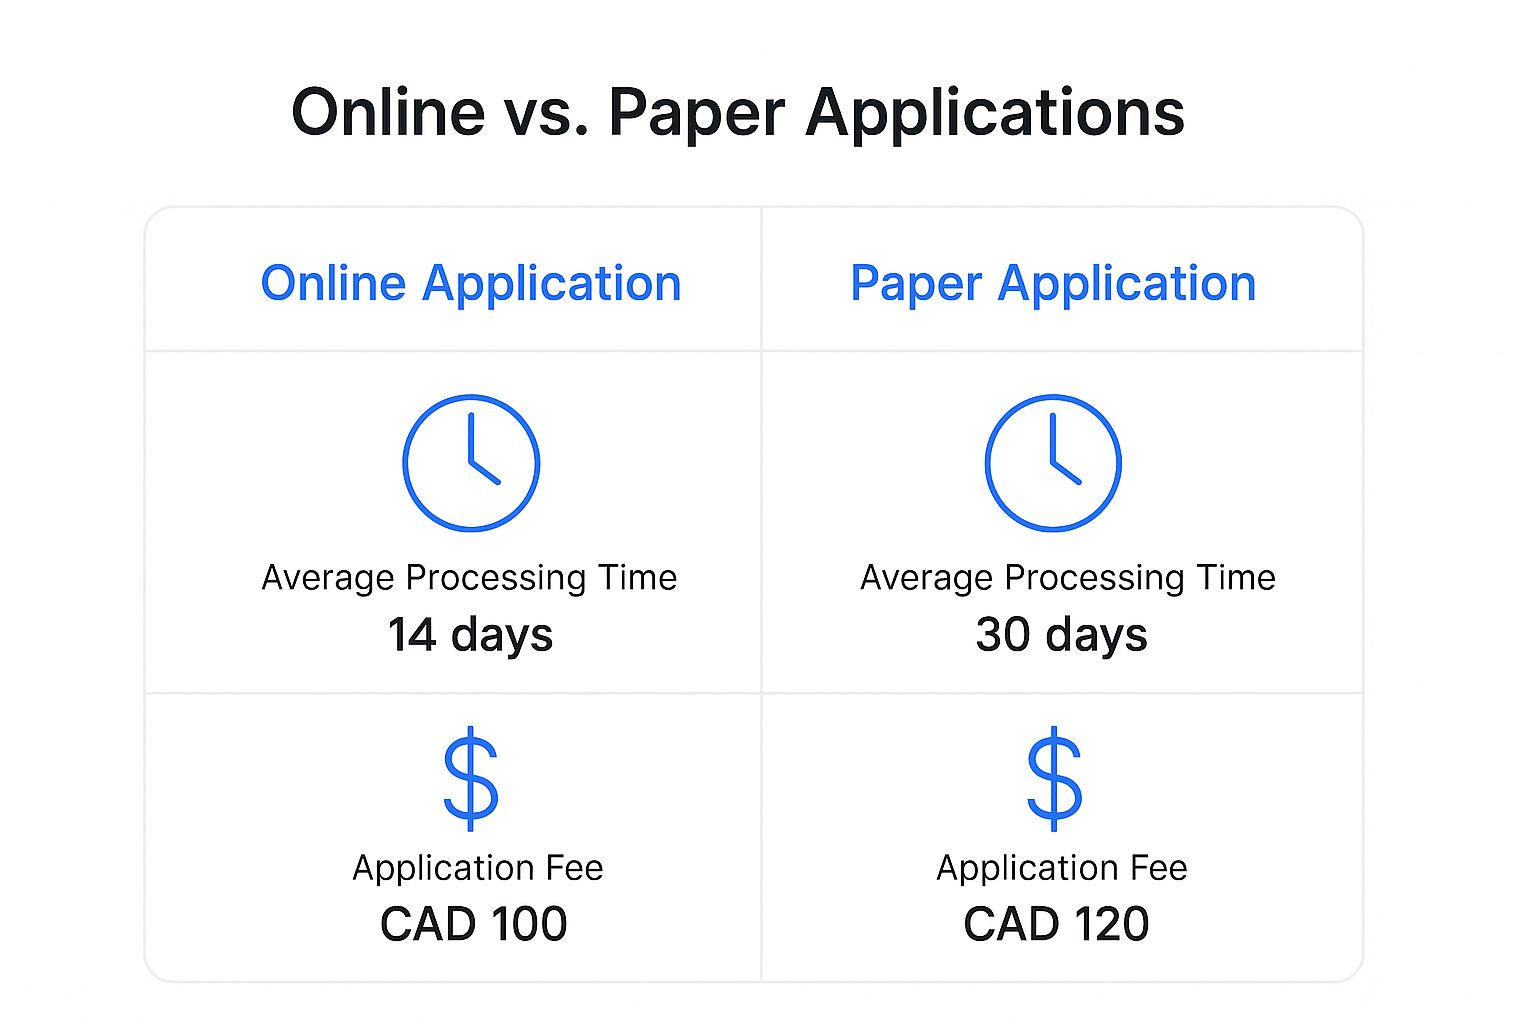
This quick visual shows that applying online is generally the better route. It tends to be faster and a little bit cheaper, which can make the whole process feel much smoother.
Even with a perfect application, it's good to know what's happening on a larger scale. In July 2025, for instance, even though overall air travel to Canada was down, arrivals from overseas non-residents actually went up by 5.6%. What does this tell us? It suggests that while Canada is definitely being selective, well-prepared Nigerian tourists who properly meet the criteria still have a very real chance of getting approved.
Your Canada Visa Questions Answered
Even when you've put together what feels like the perfect application, a few questions are bound to pop up. The Canada tourist visa process has a lot of moving parts, and it's completely normal to want a bit more clarity before you hit 'submit'.
Let's dive into some of the most common questions we get from Nigerian applicants. I'll give you straight, practical answers to help you move forward with confidence.
How Much Proof of Funds in Naira Is Enough?
This is the big one, isn't it? While there's no official "magic number" that guarantees your visa, a strong application generally shows you have access to about CAD $1,000 to $1,500 per person for every month you plan to stay. And remember, that’s on top of what you need for your flight tickets.
So, what does that look like in Naira? For a typical two-week holiday, aiming for a closing balance somewhere between ₦4,000,000 and ₦6,000,000 is a good, realistic ballpark at current exchange rates. Of course, this can shift with the market and how fancy your trip is.
But here’s the most important part: it's not just about the final amount. The story your bank statement tells is crucial. A sudden, large deposit right before you apply looks suspicious. The visa officer wants to see a consistent flow of money, like regular salary payments, that shows how you built up those funds legitimately over time.
Can I Reapply After a Canadian Visa Refusal?
Yes, absolutely. A refusal isn't the end of the road, and it’s definitely not a permanent ban. The first thing you need to do is grab that refusal letter and read it carefully. The visa officer will tell you exactly why they weren't convinced.
The biggest mistake people make is just trying their luck again with the exact same documents. That rarely works.
To have a real shot at success the second time around, your new application must directly fix the problems pointed out in the refusal letter. Simply resubmitting and hoping for a different officer is a strategy that almost always fails.
For instance, if the letter mentioned "weak ties to Nigeria," your next application needs to be packed with stronger proof. Think detailed employment letters, property documents, or evidence of family commitments you didn't include the first time.
What Is the Current Visa Processing Time from Nigeria?
Visa processing times are constantly changing. They go up and down depending on how many people are applying at any given moment. Because of this, the only place to get a reliable estimate is the official IRCC processing times tool. Make sure you check it for applications coming from Nigeria.
As a general rule, expect it to take several weeks, and sometimes even a few months. The key is to apply way ahead of time. I always advise people to submit their complete application at least 3 to 4 months before they plan to travel. That gives you a comfortable buffer for any unexpected delays and for getting your biometrics done.
Do I Really Need an Invitation Letter?
An invitation letter isn't strictly mandatory for every single tourist, but it can be a massive boost for your application. This is especially true if you're planning to stay with friends or family. It adds a whole new layer of credibility to your trip and makes your purpose for visiting crystal clear.
The letter should be written by your host in Canada, who must be a Canadian citizen or a permanent resident. Here’s what it absolutely must include:
- Your host's full details: Their name, address, and phone number.
- Proof of their status in Canada: A copy of their Canadian passport or Permanent Resident card.
- Your details: Your full name and passport information, just as they appear on your documents.
- The specifics of your visit: Why are you coming and how long do you plan to stay?
- Who is paying for what: The letter should clearly state if your host will be providing a place to stay or helping out with expenses.
Think of this letter as a reference. It helps the visa officer connect the dots and see that you have a genuine, well-planned reason for your visit.
Navigating the visa process can feel overwhelming, but you don't have to figure it all out on your own. For instant, accurate answers to your specific immigration questions, get personalised guidance from JapaChat, Nigeria's AI immigration expert. Start planning your journey with confidence today at https://japachat.com.
Leave a Reply