Canada Visitor Visa Requirements for Nigerians
To get a Canada visitor visa, Nigerian applicants essentially have to do three things: prove you have a good reason to visit, show you have enough money for your trip, and, most importantly, convince the visa officer you will return to Nigeria. This all comes down to submitting the right documents, like a valid passport, proof of your finances, and a clear itinerary.
What a Canada Visitor Visa Really Means for Nigerians
Think of your visitor visa application—officially known as a Temporary Resident Visa (TRV)—as telling a convincing story. It’s more than just paperwork; it’s about painting a clear picture for the visa officer. For Nigerians, the single most important part of that story is proving you are a genuine visitor with strong reasons to go back home after your trip.
The Canadian visa officer reviewing your application, whether in Lagos or Abuja, is trained to see the whole picture. They're looking at your file through a specific lens, trying to gauge risk and intent. Your success truly depends on how well you build your case around a few key pillars.
The Core Pillars of Your Application
Everything hinges on three big ideas. If you can present these clearly and with solid proof, you're on the right track.
-
A Clear Purpose for Your Visit: Why Canada? Is it to visit your brother in Calgary, attend a tech conference in Montreal, or just see the sights? Your reason for visiting needs to be specific, logical, and backed up with evidence like invitation letters or event registrations.
-
Sufficient Financial Capacity: You have to prove you can easily afford your entire trip—flights, hotels, food, and fun—without any intention of working illegally in Canada. This is less about having a huge lump sum and more about showing a consistent, stable financial situation.
-
Strong Ties to Nigeria: This is often the make-or-break factor. You need to show that your life is firmly rooted in Nigeria. This could be your job, your business, your family commitments, or property you own. The officer needs to be completely convinced that you have every reason to come back.
To help you get a quick overview, here's a table summarising what Canadian immigration is looking for from Nigerian applicants.
Core Requirements for a Canada Visitor Visa
| Requirement Category | What This Means for Nigerian Applicants |
|---|---|
| Valid Purpose of Travel | Clearly state if you're visiting for tourism, family, or business. Provide supporting documents like a detailed itinerary or an invitation letter. |
| Financial Stability | Show you can cover all trip expenses. This means providing bank statements for the last 4-6 months, pay slips, or a letter from a sponsor. |
| Proof of Ties to Nigeria | This is crucial. Provide evidence of employment, business ownership, property deeds, or family responsibilities that require your return. |
| Intent to Leave Canada | Your entire application must show you'll exit Canada at the end of your authorised stay. This is proven by the strength of your ties to Nigeria. |
| Admissibility | You must be in good health and have a clean criminal record. A medical exam may be required, and you'll need to declare any past legal issues. |
Ultimately, the visa officer's job is to make sure visitors will play by the rules. Your application should make their decision a straightforward "yes."
Of course, once you get the visa, the fun part begins! You can start planning all the amazing things you'll do, like checking out some of the popular fall hiking destinations in Canada. But first things first: getting these core requirements right is your top priority. With a bit of preparation and a clear understanding of what’s needed, it’s a process you can absolutely manage. This guide will walk you through it.
Proving Strong Ties to Nigeria

Let's get straight to the point: this is the most critical part of your entire application. More than your bank balance or your travel plans, the visa officer needs to be 100% convinced that your life is firmly planted in Nigeria. Your job is to paint a vivid picture of a stable, fulfilling life here—a life you would never dream of leaving behind.
You have to provide undeniable proof that you are only visiting Canada temporarily. Every single document you submit should reinforce this one central idea. For the visa officers in Abuja or Lagos, this isn't personal; it's a risk assessment based on cold, hard facts. They need to feel certain you will be on a plane back home before your authorised stay ends.
Demonstrating Strong Employment Ties
For most Nigerians, a steady job is the best anchor you can have. It shows you have a reliable income and professional duties that require your return. But just saying you have a job won't cut it. You have to prove it with official paperwork.
Here’s how to build a rock-solid case with your employment:
-
Official Employment Letter: This isn't just any letter. It must be on official company letterhead and signed by your HR manager or direct supervisor. It needs to state your job title, start date, annual salary, and—this is crucial—that your leave has been approved for the exact dates of your trip. It should also clearly state the date you are expected back at work.
-
Recent Pay Slips: Get your pay slips from the last four to six months. This provides a clear, consistent record of your income, backing up the salary figure in your employment letter.
-
Work ID Card: A simple photocopy of your official work ID card adds another layer of authenticity. It’s a small detail, but these details add up.
Put together, these documents tell a compelling story: you're a valued professional with a good job waiting for you.
"A visa officer’s primary concern is your intent to return. Strong, verifiable employment is often the most persuasive evidence you can provide. It's a clear signal of stability and responsibility in your home country."
Proving Family and Social Connections
Your family is another powerful reason to return home. The visa officer is looking for proof of close family relationships and responsibilities that tie you to Nigeria. This goes way beyond just listing names on a form; you need to provide official documents.
Think about including these:
-
Marriage Certificate: If you're married, this is non-negotiable. It proves a major spousal commitment in Nigeria.
-
Children’s Birth Certificates: If your children are staying behind in Nigeria while you travel, submitting their birth certificates is extremely powerful evidence of your ties.
-
Proof of Care for Dependents: Are you the primary caregiver for your elderly parents? A letter explaining your role, supported by documents like their birth certificates or even a doctor's note detailing their dependency on you, can be very effective.
Evidence of Business and Property Ownership
If you own a business or have significant assets in Nigeria, you're in a strong position. These ties show that you have deep financial and personal investments in the country—things you have worked hard to build and wouldn't just abandon.
-
For Business Owners: You'll need your Corporate Affairs Commission (CAC) registration documents, your business bank statements for the last six months, and recent tax clearance certificates. This proves your business is legitimate, active, and compliant.
-
For Property Owners: If you own a house or land, include the title deeds or a registered survey plan. Even proof of land that is currently under development can help. If you own rental properties, tenancy agreements are great for showing an ongoing source of income and management responsibility in Nigeria.
The reality is that getting a visitor visa is competitive. Governmental reports show that approval rates for visitor visas from African countries like Nigeria often hover between 50-70%, which underscores the intense scrutiny each application receives. This is precisely why proving strong ties isn't just a good idea—it is the single most important factor for success. You can discover more insights about visitor trends on the Statistics Canada website to understand why these requirements are so heavily weighted.
Demonstrating Sufficient Proof of Funds
When you're applying for a Canada visitor visa, the "proof of funds" part is where many people get tripped up. It’s not just about showing you have money. The visa officer needs to see a clear, believable financial story that proves two things: you can easily afford your trip without working in Canada, and the money you have is genuinely yours.
Think of your bank statement as more than just a piece of paper; it’s your financial resumé. It needs to tell a story of stable income and savings over time. This consistent history is far more powerful than a large, unexplained sum of money that suddenly appears right before you apply.
Why a Consistent Banking History Matters
For Nigerian applicants, one of the biggest red flags is something officials often see called "sponsorship dumping." This is when someone borrows a large chunk of money from friends or family and deposits it into their account just to print the statement for the application.
This immediately makes the visa officer suspicious. They'll question where the money really came from and whether you'll actually have access to it for your trip. A healthy bank statement, on the other hand, shows regular deposits like your salary and a balance that has grown steadily over several months. That’s the kind of story they want to see.
How Much Money Is Actually Enough?
While Immigration, Refugees and Citizenship Canada (IRCC) doesn’t give a magic number, you need to show you can cover all your expenses. A solid rule of thumb is to budget around CAD $1,000 to $1,500 per person for each month you plan to stay, and that’s after accounting for your return flight.
So, if you’re planning a two-week solo trip, having the equivalent of CAD $2,500 – $3,000 in your account, plus the cost of your flight ticket, is a good target. The key is to demonstrate that this amount is comfortably yours, not every last penny to your name.
A visa officer will be far more impressed by an account showing a consistent balance of ₦2 million over six months than one that jumps to ₦5 million a week before you apply. Stability always wins over a sudden, large deposit.
Acceptable Proof of Funds Documents
Your personal bank statement is the star of the show, but other documents can play a strong supporting role. Make sure you provide statements from the last four to six months. They must clearly show the bank's name, your full name, and a detailed transaction history.
If someone else is footing the bill for your trip, their financial story becomes just as crucial as yours. You'll need to provide:
- A Sponsorship Letter: This is a formal letter from your sponsor explaining their relationship to you, the precise amount they’re covering, and why they're sponsoring you.
- The Sponsor's Financials: They need to provide their own bank statements for the last six months, along with proof of their job or business, and evidence of their legal status in their country.
- Proof of Relationship: You need to connect the dots with documents like birth certificates or marriage certificates to prove your connection to the sponsor.
A believable sponsor is usually a close family member with a solid financial footing. A distant friend suddenly offering a large sum of money can look suspicious. To get a better handle on this, you can check out our detailed guide on presenting your proof of funds for Canada. Getting this financial narrative right is one of the most important steps to getting your visa approved.
Your Step-by-Step Document Checklist
Let’s be honest, gathering all the documents for a Canada visitor visa can feel overwhelming. It's easy to get lost in a sea of forms and requirements. This checklist is designed to cut through the noise and give you a clear, practical path to follow, covering everything from the main application form to the nitty-gritty details of your passport photos.
Think of this as your game plan. Ticking off each item helps you build a strong, organised application that tells a convincing story. We’ll break down every single requirement and throw in a "Nigerian Pro-Tip" to help you handle the specific hurdles that applicants from Nigeria often run into.
The Essential Application Forms
First things first, you need to tackle the core application forms. The big one is the Application for Visitor Visa (Temporary Resident Visa), officially known as form IMM 5257. You’ll also need to complete the Family Information form (IMM 5707).
- Nigerian Pro-Tip: Be completely honest on these forms. A massive mistake people make is not declaring a previous visa refusal from another country, like the US or the UK. Trust me, visa officers share information. Hiding a refusal is considered misrepresentation, and it’s a one-way ticket to another refusal and maybe even a ban. It's far better to declare it and explain what has changed since your last application.
Passport and Travel Documents
Your passport is your golden ticket. Before you even start, the first crucial step is securing your passport and making sure it meets Canada's specific rules.
-
Validity Rule: Your passport needs at least one completely blank page (not the last page) and must be valid for the entire time you plan to be in Canada.
-
Nigerian Pro-Tip: If your passport has less than a year left on it, just renew it. I know your trip might only be for two weeks, but a passport nearing its expiry date can look like poor planning to a visa officer. It’s a small detail that can make a big difference.
A solid travel history is also a huge plus. If you’ve travelled to places like the UK, USA, or Schengen countries and returned to Nigeria on time, that’s powerful proof you play by the rules.
Show off your travel history properly. Include clean, clear photocopies of all your old visas and the entry/exit stamps from your current and previous passports. This creates a visual timeline that shows you're a responsible global traveller.
Digital Photographs
Canada is incredibly strict about visa photos. Don't just pop into any roadside photo booth. You need to visit a proper studio that knows the specific requirements for Canadian visa applications.
-
Size and Quality: The photos must be exactly 35 mm x 45 mm. Your face has to be dead centre, with the picture being sharp and clear against a plain white background.
-
Expression: Keep a neutral facial expression. No smiling, no frowning.
-
Nigerian Pro-Tip: Write your full name and date of birth on the back of one of the photos. When you upload the digital copy, double-check that the file meets the exact size and dimension specs on the IRCC website. A rejected photo can stall your entire application.
The Biometrics Appointment
Just about everyone applying from Nigeria between the ages of 14 and 79 has to give their biometrics—that means your fingerprints and a photo. You’ll do this at a VFS Global Visa Application Centre (VAC) in Lagos or Abuja, but only after you’ve submitted your application and paid the fees.
You'll get a Biometric Instruction Letter (BIL) that you must bring to your appointment. It's worth knowing that since 2018, Canadian immigration has relied more heavily on biometrics to screen applicants and confirm identities, especially from high-volume countries like Nigeria. It’s their way of managing thousands of applications while making sure everyone is who they say they are.
Navigating The Visa Application Process
Alright, you've put in the hard work and gathered all your documents. Now for the crucial next step: actually submitting your application. This is where the rubber meets the road. For applicants in Nigeria, you have two ways to get your file to the Canadian authorities, but one is a clear winner in today's world.
You can either submit your application online through the official Immigration, Refugees and Citizenship Canada (IRCC) portal or go the old-school route and apply on paper at a VFS Global Visa Application Centre (VAC) in Lagos or Abuja. While having options is nice, the online method is hands-down the faster, more efficient, and less stressful choice for most people.
Online vs. Paper Application: The Nigerian Reality
Let's be blunt: Canadian immigration has moved firmly into the digital age. When you apply online, your application is logged into their system almost instantly. This completely sidesteps the delays that come with couriering paper files and waiting for someone to manually enter your data.
Going digital means you can upload your documents directly, keep an eye on your application's progress in real-time, and get updates much quicker.
Online vs. Paper Application for Nigerian Applicants
This table breaks down the key differences to help you decide which path is right for you. It's designed to help you understand the practical pros and cons of each submission method for your Canada visitor visa application.
| Feature | Online Application (IRCC Portal) | Paper Application (VFS Global) |
|---|---|---|
| Speed | Your application is submitted instantly, which often leads to faster overall processing times. | Slower from the start, due to mail transit times and manual handling at the VAC before it even reaches IRCC. |
| Tracking | You get real-time status updates directly in your secure online account. You always know where things stand. | Tracking is limited and updates can be seriously delayed. You're often left wondering what's going on. |
| Convenience | Apply from the comfort of your home, office, or anywhere you have an internet connection. | You have to physically go to a VAC, which means travel time, costs, and potential queues. |
| Corrections | If you miss a document, the IRCC can simply request you upload it through the portal. A simple fix. | A single mistake or missing document can cause your entire application package to be returned, forcing you to start over. |
| Our Verdict | Highly Recommended. This is the modern, smart way to apply. | Not recommended unless you have absolutely no other choice or are uncomfortable with technology. |
As you can see, the online portal offers significant advantages in terms of speed, transparency, and convenience.
Your Step-by-Step Online Submission Guide
Ready to jump in? Here’s a simple roadmap to lodging your application through the IRCC portal. It’s more straightforward than you might think.
- Step 1: Create Your IRCC Secure Account. Your first task is to set up a secure online account. Think of this as your personal dashboard for this application and any others you might make in the future.
- Step 2: Complete the Forms. You'll fill out the necessary forms, like the IMM 5257, directly within the portal. The system is interactive and guides you through the questions, which really helps prevent you from missing a critical section.
- Step 3: Upload Your Documents. Scan and upload all your supporting documents. Make sure the files are in an accepted format (like PDF or JPG) and that every page is crystal clear and easy to read.
- Step 4: Pay the Fees. You'll need a credit or debit card to pay the application fee (CAD $100) and the biometrics fee (CAD $85) online. The payment is secure and you get an instant receipt.
- Step 5: Submit and Wait for Your BIL. After you hit submit, you should receive a Biometric Instruction Letter (BIL) in your account, usually within 24 hours. You must have this letter to book your biometrics appointment.
This image neatly summarises the main stages.
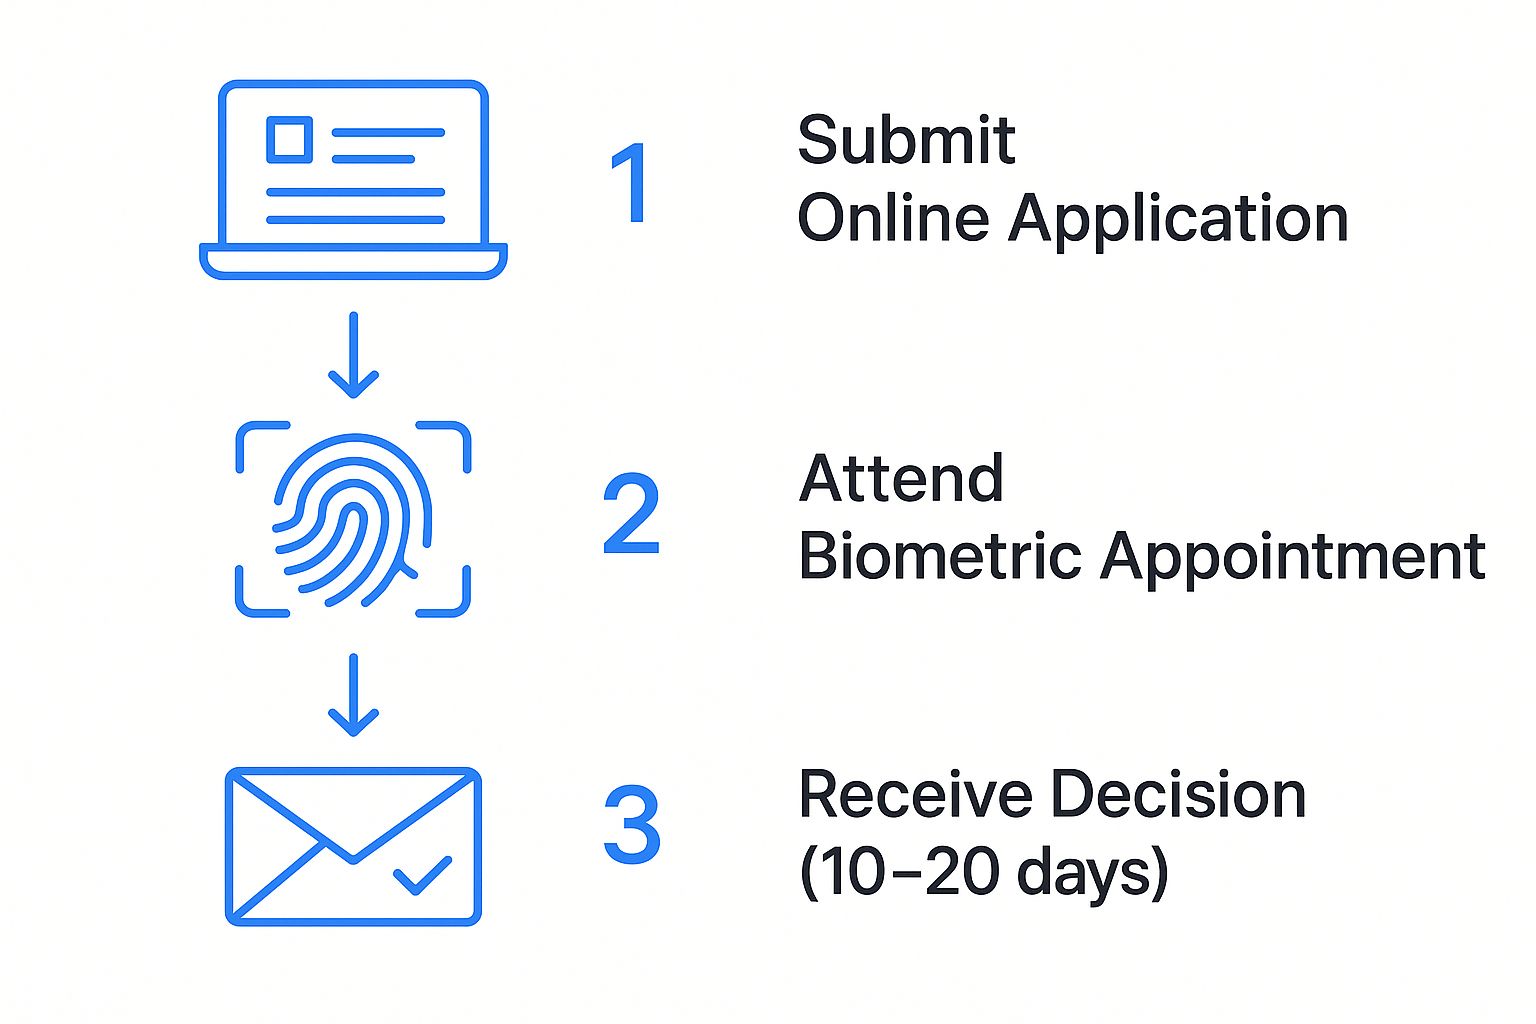
As the flow shows, after submitting everything online, your next mandatory step is giving biometrics before the final decision is made.
Booking Biometrics and Tracking Your Application
Once that Biometric Instruction Letter is in your hands, don't delay. You need to book an appointment at a VFS Global Centre in Nigeria as soon as possible, because appointment slots can get booked up quickly.
After you've given your fingerprints and had your photo taken, the real waiting game begins. You can keep tabs on your application's progress by logging into your IRCC account. Processing times can fluctuate, but applicants from Nigeria can generally expect a decision anywhere from a few weeks to a couple of months.
While this guide is focused on Canada, it's always helpful to see how other countries handle their processes. For example, you can check out a complete guide to visa types, requirements, and application processes to get a different perspective.
Steering Clear of Common Visa Refusal Traps

If you want to get a "yes" on your visa application, you first need to understand why so many get a "no." A visa refusal is a tough pill to swallow, but the good news is that most of them happen for predictable, avoidable reasons. By getting ahead of these common pitfalls, you put yourself in a much stronger position.
For Nigerian applicants, visa officers are specifically trained to look for gaps, inconsistencies, and red flags. The most common issues almost always fall into three buckets: a fuzzy reason for your trip, shaky financial documents, and a lack of convincing ties back home. Your job is to make your application so watertight and logical that the officer has no room for doubt.
Your Purpose of Visit is Murky
This is a classic mistake. Just writing "tourism" on your application is the fastest way to raise an officer's eyebrows. It's simply not enough. You have to prove you have a genuine, well-considered plan that makes sense.
Instead of being vague, get specific. A detailed, day-by-day travel itinerary shows you've done your homework. If you’re planning a two-week trip, lay it all out: "Days 1-4: Arrive in Toronto, check into XYZ Hotel, visit the CN Tower and Ripley's Aquarium. Days 5-7: Take a bus tour to Niagara Falls," and so on. This level of detail demonstrates real intent and planning.
Proactive Strategy: This is where a powerful Letter of Explanation comes in. It's your personal stage to tell your story and connect the dots for the visa officer. Explain why Canada, what you're genuinely excited to see and do, and how this trip fits into your life. A well-written letter can be the single most persuasive document in your entire application.
Your Financial Proof is Unconvincing
We've touched on how crucial your financial story is, but it's worth repeating because it's such a frequent reason for refusal. The problem usually isn't just about the total amount in your account; it's about the source of that money. A large, unexplained deposit right before you apply is a massive red flag.
What the visa officer needs to see is a stable, consistent history of income and savings building up over several months. This proves the money is legitimately yours and that you have a steady financial foundation in Nigeria. For a more detailed breakdown, check out our guide on common visa rejection reasons.
They Doubt You'll Return to Nigeria
This is the big one—the make-or-break test for any temporary visa. If the officer has the slightest suspicion that you might not leave Canada when your visa expires, your application is dead in the water. The evidence showing your strong ties to Nigeria needs to be undeniable.
It's also important to understand the current climate. A recent survey showed that 58% of Canadians feel the country is admitting too many immigrants. While this is about immigration, not tourism, that sentiment can make visa officers extra cautious. For you, this means every document proving your ties—your job, family, property—will be scrutinised to ensure you have compelling reasons to return home. Proving your intent to leave is more critical now than ever.
Your Top Questions Answered: Nigerian Applicants Edition
Going through the Canada visitor visa process can feel like a maze, especially when you're doing it for the first time from Nigeria. A lot of questions pop up along the way. I've seen them all, so I’ve pulled together the most common ones to give you straight-up, practical answers.
Let's clear the air on these key points. Getting these details right can honestly be the difference between a yes and a no.
How Much Money Is Really Enough for Proof of Funds?
Look, there’s no magic number set in stone by the Canadian government. But from experience, a good rule of thumb is to show you have around CAD $1,000 to $1,500 per person for each month you plan to stay. And that's after you've factored in the cost of your flight.
But here’s the real secret: it's not about the final balance. A visa officer is far more interested in the story your bank statement tells over time. A large sum of money that appears out of nowhere a week before you apply just screams "borrowed funds." What they want to see is a consistent, stable financial history over the last several months. That shows them the money is genuinely yours and that you have a steady financial life back home.
I Was Refused a US or UK Visa Before. Is My Canada Application Doomed?
Not at all. You can and should still apply. The golden rule here is 100% honesty. You must declare any and all previous visa refusals on your application. Trying to hide it is a massive red flag called misrepresentation, and it won't just get you refused—it could get you banned from applying to Canada for years.
The smart way to handle this is to tackle it head-on. Write a short, clear letter of explanation. State why the other visa was refused, but more importantly, show how your situation has changed for the better since then. Have you gotten a better job? A promotion? More stable finances? Demonstrating that kind of positive progress can actually strengthen your application.
My Salary Is Paid in Cash. How on Earth Do I Prove My Income?
This is a super common situation in Nigeria, so don't panic. You just have to be a bit more creative with your evidence since you don't have standard electronic payslips.
First, get a very detailed letter from your employer. It needs to spell out your job title, your exact salary, and explicitly state that it's company policy to pay you in cash. The second, and most crucial step, is to start banking your salary religiously for at least six months before you apply. This simple habit creates the paper trail—the verifiable financial history—that the visa officer needs to see. It proves your income is regular and legitimate.
Do I Need to Buy a Flight Ticket Before My Visa Is Approved?
No, please don't! This is one of the biggest and costliest mistakes I see people make. Never, ever pay for flights or book hotels you can't cancel until that visa is physically stamped in your passport. Visa officers don’t expect you to take that kind of financial gamble.
So, what should you do? Get a flight reservation or an itinerary printout from a travel agency. For your accommodation, use booking websites that let you reserve a room with free cancellation. This shows you've thought through your trip and have a solid plan, all without risking your hard-earned money. It makes you look like a responsible planner, not someone desperate to leave.
Planning your journey to Canada is a big deal, and having the right information is everything. If you need quick, personalised answers to your own questions, check out JapaChat. It’s an AI-powered tool we built specifically to guide Nigerians through the immigration process. Get your free start at https://japachat.com.
Leave a Reply