How to Apply for Canadian Work Visa from Nigeria: Step-by-Step Guide

Getting your application for a Canadian work visa off the ground in Nigeria really boils down to one thing: a valid job offer from a Canadian employer. Think of this as your golden ticket.
Most of the time, this job offer needs to be backed by a document called a Labour Market Impact Assessment (LMIA). This is something your employer gets, and it basically proves to the Canadian government that no Canadian citizen or permanent resident was available to do the job. Once you have these two key pieces, you can start gathering your own documents and get your application submitted online.
Your Starting Point for a Canadian Work Visa
Trying to figure out the Canadian work visa process from Nigeria can feel like a maze, but it all starts with understanding your options. The whole journey depends on which work permit stream fits your situation. Getting this right from the beginning is absolutely crucial because it determines exactly what you need to do and what documents you'll have to provide.
This first phase is all about matching your skills and background to Canada's immigration rules. It's not just about wanting a job in Canada; it’s about showing you meet the specific criteria for a programme that's designed to bring in the talent the country needs.
Understanding the Main Work Permit Streams
For the majority of Nigerians, the path to working in Canada begins with an employer-specific work permit. Just as the name suggests, this permit ties you to a single employer and a specific job. To even apply for this, your prospective employer typically has to secure a positive LMIA. It’s their way of showing that hiring you won’t have a negative impact on local workers.
Then there's the open work permit. These are much harder to come by and are usually for people in very specific situations. For example, you might be eligible if you're:
- The spouse or common-law partner of an international student or a skilled worker.
- A recent graduate from a designated Canadian post-secondary institution.
- A participant in a special programme, like International Experience Canada (though this is less common for Nigerians).
An open work permit is fantastic because it gives you the freedom to work for nearly any employer in Canada. But be warned, the eligibility rules are incredibly strict.
Key Canadian Work Permit Types for Nigerian Applicants
To make it clearer, here’s a quick look at the most common work permit streams available to Nigerians and what each one really hinges on.
| Permit Type | Key Requirement | Best For |
|---|---|---|
| Employer-Specific (LMIA-based) | A valid job offer supported by a positive Labour Market Impact Assessment (LMIA) from the employer. | The most common route for skilled workers who have secured a specific job in Canada. |
| LMIA-Exempt | A job offer in an occupation that is exempt from the LMIA process (e.g., under an international agreement). | Individuals with job offers in very specific, high-demand fields or under special programmes. |
| Open Work Permit | Meeting strict criteria, often related to your spouse's status in Canada or having recently studied there. | Spouses of international students/skilled workers or recent graduates from Canadian schools. |
Each pathway has its own unique set of rules, so it's vital to know which one you're aiming for before you start pulling your documents together.
My Two Cents: Your job offer is everything. A solid, legitimate offer that comes with all the required employer paperwork (especially that LMIA) is the bedrock of your application. Without it, you're not going anywhere.
The journey itself can be broken down into three main stages, which this graphic illustrates quite well.
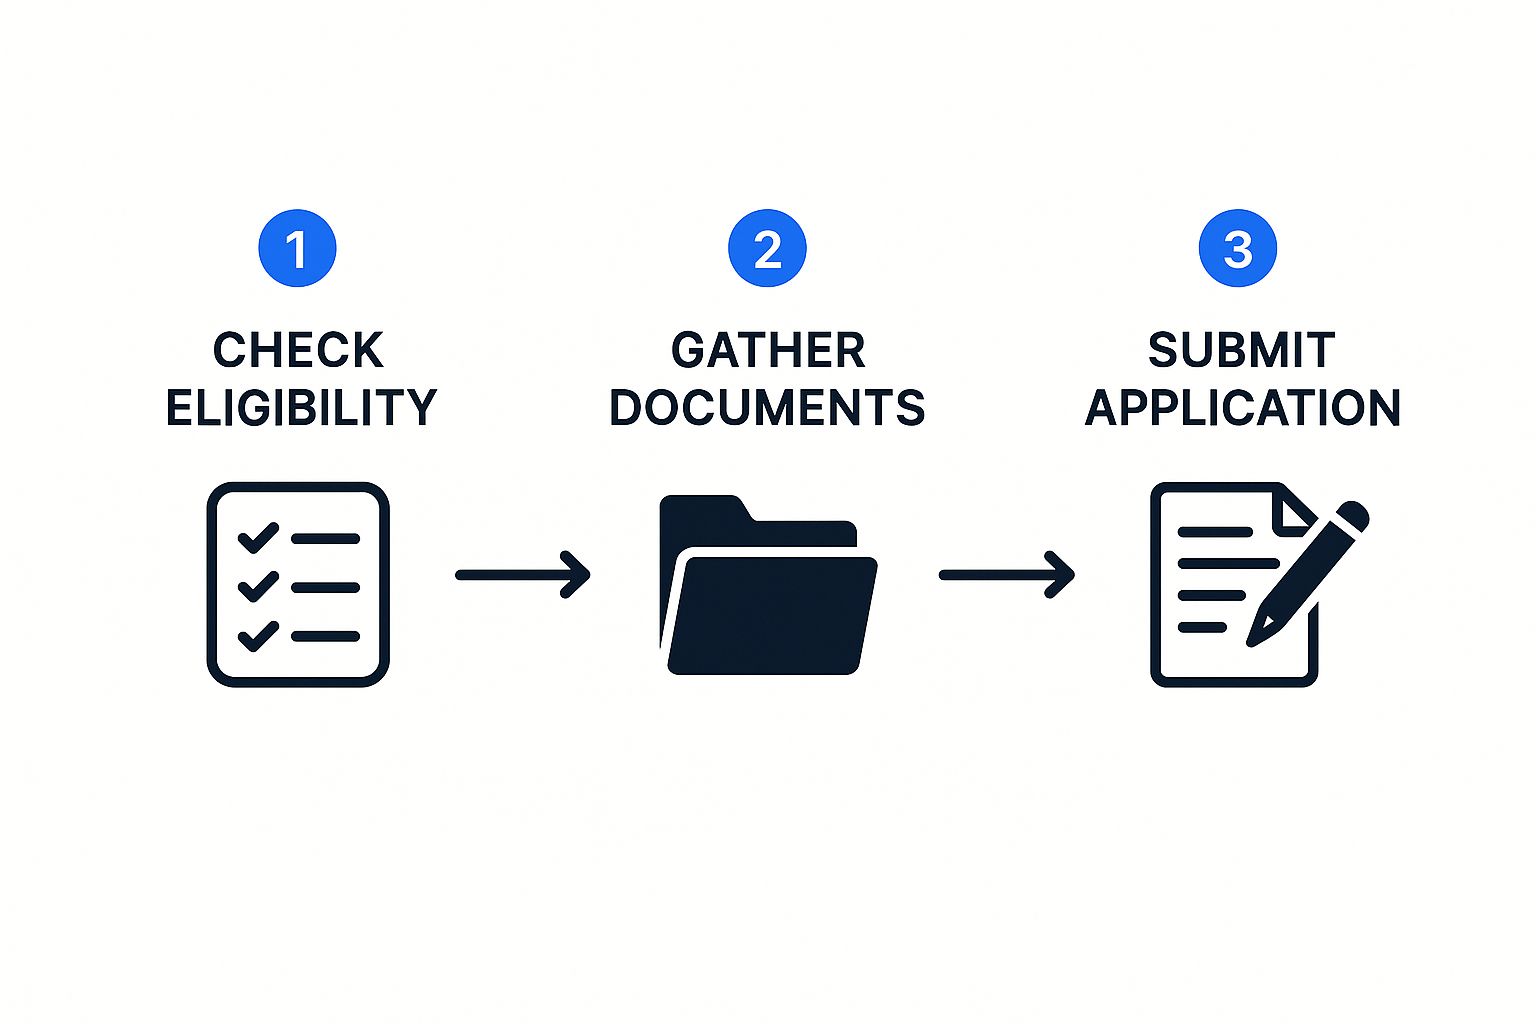
This visual just reinforces that you have to follow the steps in order. Checking your eligibility comes first, then you gather your documents, and only then do you submit. Trying to jump ahead will only cause problems.
Setting Realistic Expectations
It’s also smart to understand the bigger picture. Canada is looking to welcome a lot of new people, and many will come through economic pathways like work permits, as outlined in Canada's Immigration Levels Plan. For Nigerians, this is a double-edged sword: it means Canada wants skilled workers, but it also means the competition is fierce.
The Canadian government is working to process 80% of applications within its standard service times, but you need to do your part. You can learn more about Canada's immigration targets on canadavisa.com.
What does this mean for you? Your application has to be perfect. A single missing document or a confusing answer can lead to massive delays or, worse, a refusal. Take your time, understand the specific path you're on, and prepare your application with care. It's the best thing you can do to set yourself up for success.
Meeting Canada's Eligibility Criteria

Before you even think about filling out a single form, let's get one thing straight: you have to be absolutely sure you meet Canada's core eligibility standards. Think of this as the foundation of your application. If it’s shaky, the whole thing will come crashing down.
An immigration officer will be going through your file with a fine-tooth comb. They're not just checking if you’re a good fit for the job; they're trying to determine if you’ll be a credible temporary resident who respects the rules. At the end of the day, they are asking one simple question: "Does this person meet all our legal requirements, and will they actually leave when their visa expires?"
The Non-Negotiable Requirements
No matter what kind of work permit you’re applying for, there’s a set of universal criteria everyone has to meet. These are the absolute basics. Fail to meet even one, and you’re looking at an automatic refusal.
You need to prove to the visa officer that you:
- Will leave Canada once your work permit expires. This is probably the most critical point and the trickiest to prove.
- Have enough money to support yourself and any family coming with you, plus enough to get back home.
- Are in good health. This usually means getting a medical exam from an IRCC-approved doctor in Nigeria.
- Have a clean record with no criminal or serious immigration offences. You'll need a police clearance certificate for this.
- Don’t pose a security risk to Canada.
- Are being completely honest and have provided all the necessary documents.
Everything in your application should be geared towards reinforcing these points. You want to leave no room for doubt in the officer’s mind.
Proving You Intend to Return Home
This is the hurdle where so many Nigerian applications fall flat. The Canadian immigration officer needs to be convinced that you see your time in Canada as temporary. The best way to do that is by showing strong ties to Nigeria—basically, giving them compelling reasons why you have to come back.
So, what counts as a strong tie? It’s not just one thing, but a combination of factors. The more you have, the better your chances.
- Family Ties: Are you leaving a spouse, children, or elderly parents behind in Nigeria? These are powerful anchors.
- Employment: Do you have a good job to come back to? A letter from your current Nigerian employer granting you a leave of absence is solid gold.
- Property and Assets: Owning property, land, or having major financial investments in Nigeria shows you're planted there for the long term.
- Financial Stability: Established bank accounts and business interests in Nigeria prove you have a life and responsibilities to return to.
Real-World Scenario: Let's look at two applicants. Funke owns a flat in Lekki, her husband and two kids are staying in Nigeria, and she has an official letter from her company approving a one-year sabbatical. On the other hand, Ade is single, rents his apartment, and has just quit his job. Whose application looks more convincing? Funke’s, by a long shot. She has clearly demonstrated her strong ties to home.
Your mission is to paint a clear picture for the visa officer. Don't just tell them you'll leave; show them why you will. It’s a subtle but crucial difference. For a deeper look at the specific documents you'll need, our guide on how to apply for a work visa breaks it all down.
Showing You Have Enough Money
Another pillar of your application is proving you can support yourself financially. The Canadian government needs assurance you won't end up needing public assistance. There’s no single magic number for "proof of funds," as it depends on how long you're staying, if you're bringing family, and which city you'll be living in.
You must be able to show you can cover your initial expenses before that first Canadian paycheque comes in. This includes things like:
- Your flight to Canada.
- The first month's rent and a security deposit.
- Everyday living costs for the first few weeks.
You’ll need to provide clear, verifiable proof. We’re talking about official bank statements from the last four to six months, not just a letter from the bank with your closing balance. These statements need to show a stable financial history, not a huge sum of money that suddenly appeared last week. That’s a massive red flag for any visa officer.
A Practical Checklist for Required Documents
Getting your documents right is the foundation of a strong Canadian work visa application. I’ve seen it time and again: a single mistake, like an expired passport or a blurry scan, can bring the whole process to a screeching halt. This section is your hands-on guide to putting together a flawless package.
Think of yourself as a project manager, and this application is your baby. Every document is a crucial task you need to nail. It’s this attention to detail that often separates an approval from a refusal.
Core Personal Documents Everyone Needs
Let’s start with the basics. These are the non-negotiables—the documents every single applicant from Nigeria must have, no matter the job or permit type. Get these in order, and you're already on the right track.
First up, your Nigerian international passport. This is your most important travel document. It absolutely must be valid for the entire time you plan to be in Canada. If your passport is getting close to its expiry date, my advice is to renew it before you even think about starting your application.
You’ll also need two recent passport-sized photos. Make sure they meet IRCC's very specific rules for size, background, and even your facial expression. Don't dig up old ones; it's worth getting new photos taken just for this.
- Proof of Financial Support: You'll need to show bank statements from the last four to six months. What they're looking for is a consistent history of funds, not a huge lump sum that just appeared last week. For a deeper dive, check out our guide on the requirements for proof of funds in Canada.
- Police Clearance Certificate: This is an official document from the Nigerian Police Force that shows you have a clean record. You should apply for this early, as it can sometimes take a while to come through.
- Medical Examination: You must have a medical exam done by a panel physician in Nigeria approved by IRCC. You can't just go to your family doctor for this; it has to be one of their designated professionals.
Documents Related to Your Job Offer
Once your personal file is sorted, the next set of papers is all about your Canadian job offer. This is the proof that connects you to a specific employer and role in Canada.
The main piece of evidence here is your signed employment contract or official job offer letter. It needs to be on company letterhead and clearly spell out your job title, duties, salary, and working conditions. Leave no room for ambiguity.
Just as critical is the Labour Market Impact Assessment (LMIA) number. Your employer will give this to you. If your job is one of the few that are LMIA-exempt, your employer needs to provide the offer of employment number instead. Your application can't move forward without one of these numbers.
Expert Tip: Go through your job offer letter with a fine-tooth comb. Does the salary match what you discussed? Are the duties what you expected? An immigration officer will compare this letter against the LMIA details, and any little difference can raise a red flag.
Proving Your Work Experience and Qualifications
Finally, you have to prove you can actually do the job you’ve been hired for. This is where you provide solid evidence of your past work experience and education. Your mission is to convince the visa officer that you have exactly the skills the Canadian employer needs.
This means you'll need to gather reference letters from previous employers. A strong reference letter is on company letterhead, clearly states your job title and dates of employment, and lists your key responsibilities. Vague, one-sentence letters won't cut it.
- Educational Credentials: Have copies of your degrees, diplomas, or any relevant certificates ready. If you've gone through an Educational Credential Assessment (ECA), definitely include it, though it isn't always mandatory for a temporary work permit.
- Professional Designations: If your profession requires a specific licence or certification (like for engineers or nurses), you must provide proof that you hold it.
- Language Test Results: While not always a strict requirement for a work permit, strong English or French test scores (from a test like IELTS or CELPIP) can seriously boost your application. It shows you can easily fit into the Canadian workplace.
Remember to keep the bigger picture in mind. Canada has recently made shifts to its immigration policies that affect temporary residents, including work permit holders. These changes are designed to manage population growth and labour demands, which can mean tighter eligibility criteria. This makes submitting a perfectly prepared, thorough application more important than ever.
Getting Around the IRCC Online Portal
Alright, let's talk about the main event: the Immigration, Refugees and Citizenship Canada (IRCC) online portal. This is where you’ll pull everything together and officially submit your application. For anyone applying from Nigeria, getting comfortable with this portal isn't just a tech chore—it's your chance to present a clean, organised, and professional case.
Think of it this way: a sharp, well-managed online submission shows the visa officer you’re serious and detail-oriented. Every document correctly labelled and every form perfectly filled speaks volumes before they even read a word.
This is the IRCC homepage, your starting line for this whole digital process.
Get familiar with its layout. Knowing where to find the right forms and how to create your account will save you a ton of headaches later.
First Things First: Creating Your Secure IRCC Account
Your first real move is to set up a secure IRCC account. You'll see a couple of sign-in options, but for most applicants in Nigeria, the best route is to register with a GCKey. This is just a secure username and password that acts as your key to Government of Canada online services.
During setup, you'll need to create security questions. Please, don't just breeze through this part. Write down your answers and keep them somewhere safe. Trust me, the last thing you want is the stress of getting locked out of your account because you can't remember your first pet's name.
Building Your Personalised Document Checklist
Once you're in, the system won't just hand you a generic list of documents. It's smarter than that. You'll go through a questionnaire that builds a checklist tailored specifically to you. This is a make-or-break moment.
The questionnaire will ask about things like:
- Your country of citizenship (Nigeria)
- Your age, spouse, and children
- The exact type of work permit you’re after
- Your LMIA number or offer of employment number, if you have one
Your answers here are everything. They determine exactly which forms and supporting documents you need to upload. One wrong answer could send you down a completely incorrect application path.
My Advice: Before you even start that questionnaire, have your passport, job offer letter, and LMIA confirmation sitting right next to you. This helps you enter every date, name, and reference number with 100% accuracy. A tiny typo here can snowball into a massive problem.
Filling Out the Application Forms the Right Way
The portal will generate several forms for you, but the big one is the Application for Work Permit Made Outside of Canada (IMM 1295). You have to download this form, fill it out on your computer using a PDF reader, and then—this is crucial—validate it.
When you click the "Validate" button, a page of barcodes will appear at the end of the document. You must upload the version of the form that includes these barcodes. They hold all your entered data, allowing the IRCC system to process your info quickly. Submitting an unvalidated form is a classic mistake that can get your application sent right back to you.
Be clear and concise in your answers. If a form asks for your work history for the last 10 years, give them exactly that—no more, no less. Don't leave any time gaps. If you were studying or unemployed for a period, just say so. For a deeper dive into visa types, our guide on the differences between a Canada work visa and a work permit is a great resource.
Uploading Your Documents and Paying the Fees
The portal creates specific upload slots for every document on your checklist. Pay close attention to the file requirements. They usually accept PDF, JPG, or PNG files, but the maximum size is typically 4 MB per file.
If your document is too large, you'll have to compress it. Just make sure it's still perfectly legible. A blurry bank statement is as useless as no bank statement at all.
Finally, you'll be sent to the payment gateway to cover the application and biometrics fees. Make sure you use a credit or debit card that's approved for international payments. Once the payment goes through, you can hit submit.
Keep in mind that IRCC processes hundreds of thousands of work permit applications every year. While they aim to meet service standards for 80% of applications, the sheer volume can lead to delays. A complete and accurate submission is your best strategy for a smooth journey. You can learn more about IRCC's application processing capacities on their official site.
So, You've Submitted Your Application. Now What?

That feeling when you finally hit "submit" on your IRCC application is incredible, isn't it? But hold on, the journey isn’t quite over. Now comes the part that tests your patience, a phase of waiting and a few more crucial steps. Knowing what's coming next can make this period a whole lot less stressful.
The very first thing to do is keep a close eye on your IRCC account. Usually within 24 hours of submission, you should see a message pop up with your Biometric Instruction Letter (BIL). This is the document you absolutely need to move forward, as it’s your official invitation to provide your fingerprints and photo.
Don't Delay Your Biometrics Appointment
Once that BIL is in your hands (or, well, on your screen), your next move is to book an appointment at a Visa Application Centre (VAC) in Nigeria. You'll find them in major cities like Lagos and Abuja, and they are the only places officially authorised to handle biometrics for the Canadian government.
This step is time-sensitive. You have just 30 days from the date on your BIL to get your biometrics done, so don't put it off.
When you go to book your slot online, you'll need the reference number from your BIL. On the day, make sure you have these three things with you:
- Your valid Nigerian international passport.
- A printed copy of your Biometric Instruction Letter (BIL).
- The confirmation letter for your appointment.
The actual process is quick and painless. An official will take your digital fingerprints and a photo. It’s purely administrative, not an interview, so there’s no need to stress about being asked questions about your application.
The Real Deal on Processing Times
After your biometrics are in the system, the real waiting game begins. This is where you have to manage your expectations. While IRCC does provide estimated processing times on their website, think of them as general guidelines, not guarantees.
Your personal timeline can vary quite a bit. A super-clean application for an in-demand job with a well-known employer might sail through. But if your case has some complexities—maybe a previous visa refusal or documents that require extra verification—it’s naturally going to take longer.
Expert Tip: The processing clock doesn't start the moment you submit your application. It officially begins after your biometrics are completed. This is a common point of confusion that causes a lot of unnecessary worry for applicants.
How to Keep Tabs on Your Application Status
The best way to monitor your application's journey is by logging into your secure IRCC account. The status updates can be a bit generic, but they do give you a rough idea of where your file is in the queue. Don't expect to see changes every day; updates often happen in batches as your application moves from one stage to the next.
Here’s a quick rundown of what those common status updates really mean:
| Status Update | What It Usually Means |
|---|---|
| Submitted | IRCC has successfully received your application. |
| Biometrics Completed | Good news! The VAC has sent your biometrics to IRCC. |
| Review of Eligibility | An officer is now going through your documents to see if you qualify. |
| Background Check | Your information is being checked for any security or criminal flags. |
| Final Decision | A decision has been made. You'll get a message with the outcome soon. |
Seeing your status shift to "Background Check" is generally a positive sign—it confirms your file is actively being worked on. The "Final Decision" update will be followed by a message in your account. This will either be a passport request for visa stamping (congratulations!) or a letter explaining why the application was refused. For now, stay patient and check your account every so often for that all-important update.
Common Questions About the Canadian Work Visa
When you're deep in the process of applying for a Canadian work visa from Nigeria, a lot of "what if" questions pop up. It's completely normal. Even the best guides can't cover every single personal scenario.
Let's tackle some of the most frequent questions we get from applicants just like you, so you can have the clarity to keep moving forward.
Can I Bring My Family With Me on a Work Visa?
This is a big one, and the short answer is yes, you absolutely can. If you secure a valid work permit, your spouse or common-law partner can typically apply for an open work permit. This is fantastic because it means they can work for almost any employer in Canada, giving your family a lot more flexibility.
Your dependent children can join you as well. Depending on their age, they'll need either a visitor record or, if they'll be in school, a study permit. A key piece of advice: try to submit their applications at the same time as yours. If that's not possible, do it right after your own work permit gets approved to keep the process smooth.
What Happens if My Work Visa Application Is Refused?
Getting a refusal notice is tough, but it doesn't have to be the end of your Canadian dream. Don't panic. The very first thing you need to do is read that refusal letter, word for word. The immigration officer is required to explain exactly why they said no.
For many Nigerian applicants, the reasons often boil down to a few common issues:
- Weak ties to Nigeria: The officer wasn't convinced you have strong enough reasons (family, property, a career path) to return home once your work permit expires.
- Shaky proof of funds: Your financial documents might not have shown a stable, sufficient amount of money to support yourself.
- Doubts about the job offer: Sometimes, the officer might question if the job offer is genuine or if you're truly qualified for the role.
Once you pinpoint the problem, you can plan your next move. You can reapply, but only if you can provide new, compelling evidence that directly addresses the officer's concerns. Just sending the same old documents back is a surefire way to get another refusal.
How Much Money Do I Need for Proof of Funds?
There's no single magic number that works for everyone. The amount you need really depends on your situation—are you coming alone or with family? The goal is to prove to the visa officer that you can handle your initial costs when you land in Canada, well before you get your first salary.
Think about what you'll need to cover right away:
- Your flight to Canada.
- The first month's rent plus a security deposit.
- Basic living expenses like groceries, transport, and setting up utilities for a few weeks.
A good benchmark to aim for is at least $2,500 to $3,500 CAD for a single person. If you're bringing family, add about $2,000 CAD for each person. But here’s the real expert tip: the history of your funds is more important than the final balance. A large sum of money that suddenly appears in your account looks suspicious. Consistent savings over several months looks credible.
Can I Work for a Different Employer on My Visa?
This is a critical point to understand. It all comes down to the type of work permit you have. Most first-time work permits issued to Nigerians are employer-specific. This means your permit is tied to the single employer who gave you the job offer.
If you get a new job offer and want to switch employers, you can't just quit and start the new role. You must apply for and receive a brand new work permit that names your new employer. Starting a new job before that new permit is approved is a serious violation of your visa conditions and could get you into a lot of trouble, potentially even ruining your future in Canada.
Ready to take the guesswork out of your immigration planning? JapaChat is Nigeria’s first AI immigration expert, designed to give you instant, accurate answers to all your relocation questions. Get started for free and join over 10,000 Nigerians planning their move with confidence. Start your journey today at https://japachat.com.
Leave a Reply