How to Get a Work Permit in Canada for Nigerians
So, you’re looking to get a work permit for Canada from Nigeria. The most common way forward is to have a valid job offer from a Canadian employer already in hand.
Typically, this means your future boss needs to get something called a Labour Market Impact Assessment (LMIA). Once they have that sorted, you can apply for what's known as an employer-specific work permit with Immigration, Refugees and Citizenship Canada (IRCC). Some people might also be eligible for an open work permit, which gives you a lot more flexibility.
Understanding Your Canadian Work Permit Options
Before you start picturing yourself in Vancouver or Montreal, you need to get a handle on the different routes available. The Canadian work permit system isn't a "one-size-fits-all" deal. The best path for you really boils down to your personal and professional situation. For most Nigerians, the first step is figuring out which of the two main types of work permits is the right fit.
Choosing incorrectly at this early stage can cost you a lot of time and money. It's like planning a trip from Lagos to Abuja—you could fly or take a bus. Both get you there, but the preparation, cost, and time involved are worlds apart. It's the same when deciding between an employer-specific permit and an open one; it dictates your entire application strategy.
The Employer-Specific Work Permit
This is the route most Nigerians take. Just like the name implies, an employer-specific work permit ties you to a single employer, in a specific role, at a particular location.
Let's say a tech firm in Waterloo offers you a job as a software developer. This permit means you can only work for that company in that specific job. You can't just pick up a side hustle or jump to another company without going through the process of applying for a brand-new permit.
Usually, your employer has to do some legwork first. They often need to get a positive Labour Market Impact Assessment (LMIA). This is a document from the Canadian government confirming that they tried to hire a Canadian or permanent resident for the job but couldn't find anyone suitable. Essentially, it proves there's a real need for a foreign worker.
The Open Work Permit
An open work permit is the golden ticket for flexibility. It lets you work for nearly any employer, anywhere in Canada, without needing a job offer lined up beforehand. Think of it as being a freelance consultant in Lagos—you have the freedom to work with different clients all over the country.
But here's the catch: not just anyone can get one. Open work permits are reserved for people in specific situations.
You might be eligible if you are:
- The spouse or common-law partner of a skilled worker or an international student in Canada.
- An international student who just graduated from a specific type of Canadian college or university.
- The holder of a temporary resident permit.
A very popular type of open permit is the Post-Graduation Work Permit (PGWP). For Nigerians who choose to study in Canada first, this is an incredible opportunity. If this sounds like you, we've covered everything you need to know about making that switch in our guide on the https://blog.japachat.com/canada-post-graduate-work-permit/.
My Advice: Be realistic about your options. An open permit sounds great because of the freedom it offers, but the employer-specific route is often the most direct path for skilled professionals in Nigeria who have already landed a job offer from a Canadian company.
To help you see the differences clearly, this quick comparison should point you in the right direction.
Employer-Specific vs Open Work Permit at a Glance
Here’s a quick comparison to help you understand which Canadian work permit pathway is right for your situation.
| Feature | Employer-Specific Work Permit | Open Work Permit |
|---|---|---|
| Job Offer Required? | Yes, from a specific employer. | No job offer is needed to apply. |
| LMIA Needed? | Usually, yes. The employer must obtain it. | No. |
| Employer Freedom | Tied to one employer, role, and location. | Can work for almost any employer in Canada. |
| Who Is It For? | Most foreign workers with a job offer. | Spouses, recent graduates from Canadian schools, etc. |
| Application Process | Your application is tied to your employer's. | You apply based on your own eligibility. |
Ultimately, the employer-specific permit is the more common starting point, while the open permit is an option for those who meet a narrower set of criteria.
This image breaks down the core differences visually.
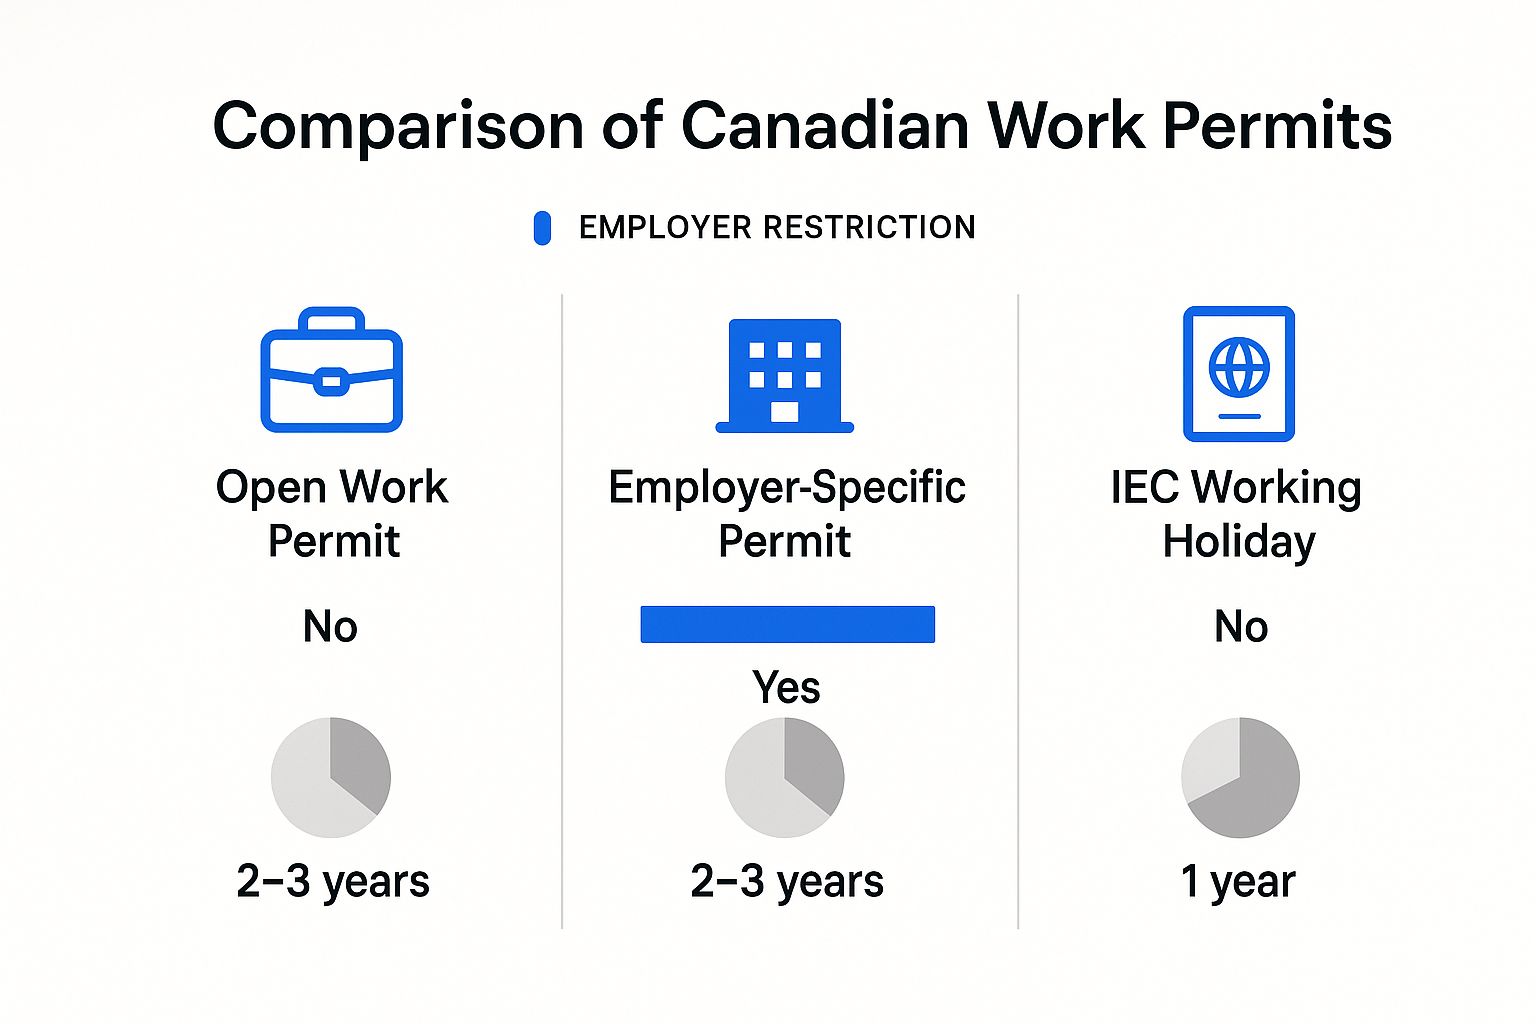
As you can see, while an open permit gives you the freedom to move between jobs, it’s usually only available to a specific group of people. The employer-specific permit, on the other hand, is the more standard route for most applicants.
Meeting the Eligibility Checklist for Nigerians
Alright, you've identified the right permit for your situation. Now comes the reality check: proving to the Canadian government that you tick all their boxes. This is more than just collecting documents; it's about building a compelling case that convinces a visa officer you're a genuine temporary worker who will respect Canada's immigration laws.
Think of it as preparing for the most important interview of your life. For every question they might have about your background, your intentions, and your ability to support yourself, you need a clear and credible answer. For Nigerian applicants, this means paying close attention to a few areas that are always under the microscope.
Demonstrating Your Ties to Nigeria
This is often the biggest hurdle. You must convince the visa officer that you have strong reasons to return to Nigeria once your work permit expires. This is what's known as "ties to home."
Just saying you'll come back won't cut it. You need to show them with concrete proof.
- Family: Do you have a spouse, children, or elderly parents who rely on you back home? Marriage certificates, birth certificates, and even photos can help paint this picture.
- Property & Assets: Owning land or a house in Nigeria is powerful evidence. Get your deeds and property documents in order.
- A Stable Career: If you’re taking a leave of absence, a formal letter from your Nigerian employer stating that your job is waiting for you is an excellent piece of evidence.
- Business or Financial Investments: Do you have a business or significant investments in Nigeria? These show you have deep roots and something substantial to return to.
This isn’t about downplaying your Canadian ambitions. It’s about reassuring the officer that you have an established life and responsibilities in Nigeria that you won’t simply walk away from.
Proving You Have Sufficient Funds
Even with a job offer in hand, you need to show you have enough money to handle your initial settlement costs in Canada. This tells the Canadian government you won't become a financial burden while you get on your feet.
There isn’t an official magic number, but a good benchmark is to have enough to cover your first few months of rent, transportation, and living expenses. Aiming for CAD $3,000 to $5,000 for a single applicant is a solid target. That's roughly ₦3.4 million to ₦5.7 million, depending on the daily exchange rate.
Crucial Tip: The funds must be in your bank account, and you’ll need to provide statements from the last four to six months. A large, last-minute deposit—what many call "tokunbo funds"—is a major red flag for visa officers. The money needs to look like it has been legitimately yours over a period of time.
The Mandatory Medical Examination
If you're coming from Nigeria to work in Canada for more than six months, a medical exam is non-negotiable. And you can't just visit your family doctor for this.
You must book your appointment with a specific panel physician approved by Immigration, Refugees and Citizenship Canada (IRCC). In Nigeria, this is typically handled at the IOM (International Organization for Migration) clinics in Lagos or Abuja. The exam involves a physical check-up, chest X-rays, and blood tests to screen for certain health conditions.
Obtaining a Police Clearance Certificate
Canada needs to be sure you aren't inadmissible on criminal or security grounds. You'll prove this by getting a Police Clearance Certificate (PCC) from the Nigeria Police Force Criminal Investigation Department (CID).
A couple of things to know about the Nigerian PCC process:
- You’ll need to provide your personal data and have your fingerprints taken.
- This process can sometimes drag on, so start early. Don't leave this until the last minute.
- The certificate confirms whether you have a criminal record in Nigeria.
Getting through these eligibility checks is a huge step forward. It signals you're a serious, well-prepared applicant. Plus, keep in mind that Canadian work experience is becoming an incredibly valuable asset. Recent data shows that former temporary workers are making up a larger share of new permanent residents, as immigration policies now favour those with in-Canada experience. You can find more insights on how work permits are a growing pathway to PR on immigration.ca. This makes it more important than ever to get your application right from the very beginning.
Getting Your Paperwork in Order

Alright, this is where you roll up your sleeves. Think of it like putting together a pitch for the most important project of your life—because it is. Every single document you submit needs to tell a part of your story and build a strong case for why you should be approved.
For many Nigerians, the sheer amount of paperwork can feel like a mountain. But trust me, a bit of organisation now saves a world of headache later. A messy or incomplete application is one of the quickest ways to get a refusal, so let's get this right from the very beginning.
The Absolute Essentials for Everyone
No matter which work permit stream you're applying through, some documents are simply non-negotiable. These are the foundation of your entire application.
First up, your international passport. This is your most critical ID. Check the expiry date right now. If your job offer is for two years but your passport expires in 12 months, your work permit will likely be cut short to match. My advice? If you have less than two years left on it, just renew it before you apply.
Next, you'll need two recent passport-sized photos. These aren't just any studio pictures; they have to meet the very specific IRCC photo requirements. Finally, you’ll need the core application forms, like the IMM 1295 (Application for Work Permit Made Outside of Canada).
Proving You’re the Right Person for the Job
Having a job offer is great, but you have to prove to Immigration, Refugees and Citizenship Canada (IRCC) that you actually have the skills to do it. This is where your qualifications come into play.
For most skilled roles, an Educational Credential Assessment (ECA) is a must-have. This report confirms that your Nigerian degree or diploma is equivalent to a Canadian one.
- For University Graduates: You’ll need to have your university in Nigeria send your transcripts directly to a designated organisation like World Education Services (WES) for evaluation.
- For WAEC Holders: Don't overlook this! Even your WAEC certificate can be assessed, which can be surprisingly useful for certain technical or trade-focused jobs.
You also need detailed reference letters from your past employers. These can't be generic. They must clearly list your job duties, key responsibilities, and the dates you worked there, making sure they align perfectly with the role you’ve been offered in Canada.
A common mistake I see is a vague reference letter. Something that just says "Tunde worked with us as a Project Manager" is practically useless. A strong letter will detail the specific projects Tunde led, the software he was proficient in (like Jira or Asana), and the successful outcomes he delivered.
Backing It Up with Financial and Employment Docs
Now for the money talk. You must prove you can support yourself when you first land in Canada, even with a job lined up. This is where your proof of funds comes in.
You'll need your bank statements from the last four to six months. The visa officer is looking for a stable financial history, not a large, unexplained sum of money that suddenly appeared last week. For a full walkthrough on this, check out our guide on how to prepare your proof of funds for Canada.
Of course, you’ll also need the key documents from your Canadian employer:
- A formal job offer letter: This needs to be on official company letterhead and clearly state your role, salary, and working conditions.
- Your employment contract: You'll need to provide a copy that has been signed by both you and your employer.
- The LMIA number: If your job requires a Labour Market Impact Assessment (LMIA), your employer must give you this crucial seven-digit number to include in your application.
The Canadian government’s website has a fantastic document checklist generator. It’s a tool I always recommend to ensure you don’t miss a single form based on your specific situation.
Don't Forget the Letter of Explanation
Let me tell you, the Letter of Explanation is your secret weapon. It’s not officially required, but it’s a golden opportunity to speak directly to the visa officer reviewing your file.
This is your chance to connect all the dots. Use it to explain a gap in your employment history, clarify where a large deposit in your bank account came from, or really drive home your strong family and economic ties to Nigeria. A clear, well-written letter can transform a potentially confusing application into a compelling and approvable one. Don't skip it.
Navigating the Online Application and Biometrics
With all your paperwork organised, you’ve reached the final sprint—submitting everything online and getting your biometrics done. This is where all that careful preparation truly pays off. The entire process unfolds on the Immigration, Refugees and Citizenship Canada (IRCC) website, and while it's designed to be straightforward, your attention to detail here is absolutely everything.
Think of the IRCC portal as your official submission counter. One tiny mistake, like uploading a blurry document or mixing up form fields, can cause serious delays or even lead to an outright refusal. Let's walk through this digital process step-by-step so you can cross the finish line with complete confidence.
Creating Your IRCC Secure Account
First things first, you need to create a secure online account on the IRCC portal. This account becomes your personal dashboard for your entire immigration journey—it’s where you'll submit your application, get messages from IRCC, and track your status.
When you're setting up the account, you’ll have to create some security questions. Please, I can't stress this enough: write these answers down and keep them somewhere safe! Forgetting them is like losing the keys to your house; it’s a massive headache to get back in. Countless Nigerians have been locked out of their accounts at critical moments simply because they couldn't remember the name of their primary school teacher or their favourite childhood food.
Once you’re in, the system will ask you a series of questions about your application. Your answers will generate a personalised document checklist, showing you exactly which forms and supporting documents you need to upload.
Filling Out the Forms and Uploading Documents
The core of your application is the IMM 1295, which is the Application for Work Permit Made Outside of Canada. Take your time with this form. Double-check every single detail, from your date of birth to your passport number, making sure it perfectly matches all your other documents.
After you've filled it out, you'll need to "validate" it, which creates a new page with barcodes. Save this final, validated version. This is the one you'll upload.
Here’s some practical advice for the upload stage that I've learned from experience:
- Be Smart with File Names: Name your files clearly. Instead of a generic "scan_001.pdf," use something specific like "Tunde_Adebayo_Passport.pdf" or "Tunde_Adebayo_WES_Report.pdf." It helps you stay organised and shows the officer a tidy file.
- Watch the File Size: IRCC has a file size limit, which is typically 4 MB per file. If your scanned documents are too large, use a reliable online PDF compressor to shrink them down without sacrificing quality.
- Clarity is Non-Negotiable: Make sure every scan is crystal clear and easy to read. A blurry proof of funds statement from your GTBank account will be rejected without a second thought.
A common pitfall is uploading documents into the wrong slots. The portal has specific upload fields for "Proof of Funds," "Passport," "Job Offer," and so on. Meticulously match each document to its correct field. Submitting a jumbled, disorganised application is a major red flag for any visa officer.
The Crucial Biometrics Step for Nigerians
For virtually all Nigerian applicants, providing biometrics—your fingerprints and a photograph—is a mandatory part of the process. You simply cannot get a work permit without it. You’ll pay the biometrics fee online at the same time you submit your application fees.
The current fee is CAD $85 for an individual or CAD $170 for a family applying together. Once you've paid, you will receive a Biometric Instruction Letter (BIL) in your IRCC account, usually within 24 hours. You absolutely need this letter to book your appointment.
You must book an appointment at a Visa Application Centre (VAC). In Nigeria, the main VACs are in Lagos and Abuja. Don't just show up at their door; appointments are mandatory and can fill up very quickly, so book yours the moment you receive your BIL.
When you go for your appointment, remember to bring your passport, the BIL, and your appointment confirmation letter. The process itself is quick and simple—they’ll scan your fingerprints and take your photo. This data is what allows the Canadian government to run essential security and background checks, making it a non-negotiable step on your path to getting that work permit.
Looking Beyond Toronto: Where the Real Provincial Opportunities Are
When most Nigerians dream of working in Canada, their minds usually jump straight to big names like Toronto, Vancouver, or Calgary. It's understandable, but thinking that way is a bit like assuming all the best opportunities in Nigeria are only in Lagos or Abuja. You'd be overlooking the incredible potential simmering in places like Port Harcourt or Kano. The same logic applies to Canada.
Many skilled professionals are now realising that some of the quickest and most solid routes to a Canadian work permit are found in provinces they might have initially overlooked. These provinces are actively hunting for international talent to fill very real gaps in their local job markets, creating a much more direct pathway for people with the right skills.
Why These Provinces Want You
Here’s the inside track: Canada’s provinces have a powerful tool called the Provincial Nominee Program (PNP). It’s their secret weapon for attracting the exact workers they need.
Through a PNP, a province can nominate you for immigration if your skills match what's in high demand in their region. Getting that provincial nomination is a massive boost to your application. It often paves a clearer, faster road to not just a work permit, but permanent residency down the line.
And we're not talking about just any random jobs. Provinces are looking to solve critical labour shortages in sectors like healthcare, construction, transportation, and tech. If you're a nurse, a long-haul truck driver, a welder, or a software developer in Nigeria, there's a very good chance a Canadian province is actively looking for someone with your exact skillset.
A Real-World Example: New Brunswick
Let’s take a look at New Brunswick, a province on Canada's east coast. It's a perfect case study of a region that's not just sitting back and waiting for applications to roll in. They are on the front foot, creating specific immigration streams to bring in skilled workers to grow their communities and power their economy.
This isn't just talk. To fight their own serious labour shortages, New Brunswick made a big move in 2025. The government boosted its PNP nominations by 1,500 spots, laser-focusing on skilled workers for jobs in healthcare, education, and construction. For a Nigerian with a background in one of these fields, this means a province isn't just open to your application—they are practically inviting it. You can see more on New Brunswick's increased immigration numbers on immigcanada.com.
A provincial nomination is like getting a massive vote of confidence. It's a province telling the federal immigration authorities, "We've checked this person out, and we need their skills here." That endorsement can be the single biggest factor in getting your work permit approved.
How a PNP Can Fast-Track Your Work Permit
Landing a job offer from an employer in a province with a relevant PNP stream can completely change the game for you. Here’s why it’s such a big deal for your work permit application:
- Targeted Opportunities: You're no longer competing against a massive pool of applicants from all over the world for jobs anywhere in Canada. You're applying for specific roles that a province has already declared it can't fill locally.
- A Stronger Application: A provincial nomination, or even just a job offer that's supported by a PNP stream, adds serious weight to your case. It shows you're wanted and needed.
- A Clearer Path to PR: Many PNPs are specifically designed to be a stepping stone to permanent residency. Your work permit becomes the first concrete step on a very clear path to settling in Canada for good.
Provinces like New Brunswick, Saskatchewan, and Manitoba are brimming with opportunities for Nigerians willing to look beyond the usual big-city hubs. The process might vary a little from one province to the next, but the mission is always the same: connect skilled workers like you with Canadian employers who desperately need your expertise.
If this strategy sounds like it could work for you, you'll definitely want to read our detailed guide on how the Saskatchewan PNP works for Nigerians. Broadening your job search to include these provinces could be the smartest move you make on your journey to working in Canada.
Right, let's break down exactly what you'll need to do to get your Canadian work permit application across the line. It might seem daunting, but think of it as a clear, logical process. We'll go through everything from checking if you're even eligible to what happens after you hit 'submit'.
Your Step-by-Step Guide to Applying for a Canadian Work Permit
Getting your application right the first time is crucial. It saves you time, money, and a whole lot of stress. I've seen countless applications, and the ones that succeed always have one thing in common: attention to detail.
Here’s the game plan we'll follow:
- Determine Your Eligibility: First things first, are you eligible? We'll look at the core requirements.
- Gather Your Documents: This is where most people get tripped up. I'll give you a comprehensive checklist.
- Complete and Submit Your Application: Filling out the forms correctly is key. We'll cover the online and paper options.
- After You Apply: The waiting game begins, but there are still things you need to do.
Let's dive in.
Step 1: Confirm Your Eligibility
Before you spend a single minute gathering documents, you need to be absolutely sure you qualify. Canada has specific requirements that every applicant must meet, no exceptions.
You must:
- Prove to an immigration officer that you will leave Canada when your work permit expires. This is non-negotiable.
- Show you have enough money to support yourself and any family members during your stay and to return home.
- Have a clean criminal record. You'll likely need to provide a police clearance certificate.
- Not be a danger to Canada's security.
- Be in good health and get a medical exam if required.
- Not plan to work for an employer who is on the list of “ineligible” employers.
- Provide any other documents the officer asks for to prove you can enter the country.
Think of it from the officer's perspective: they need to be convinced you're a genuine temporary worker who will respect the rules.
Step 2: Gather All Required Documents
This is the most time-consuming part of the process, but getting it right is everything. A missing or incorrect document can lead to an outright refusal. Start gathering these well in advance.
Here’s your essential document checklist:
Your Application Forms
Depending on your situation, you’ll need specific forms. The most common one is the Application for Work Permit Made Outside of Canada (IMM 1295). Make sure you download the latest version directly from the official IRCC website. Outdated forms are a common reason for applications being returned.
Proof of Identity
This is straightforward but critical. You'll need:
- A valid passport with at least one blank page (other than the last page). It must be valid for the entire duration of your intended stay.
- Two recent passport-sized photos that meet Canada’s strict photo specifications. Don't try to take these yourself; go to a professional.
Proof of Employment in Canada
This is the core of your application. You need to show you have a legitimate job offer.
You'll need at least one of these:
- A copy of your Labour Market Impact Assessment (LMIA).
- The offer of employment number (for LMIA-exempt workers). Your employer provides this.
- A copy of your employment contract.
Expert Tip: Ask your employer to review these documents with you. A simple typo in the offer of employment number can cause major delays. It’s a shared responsibility to get this right.
Proof of Educational and Professional Qualifications
You have to prove you can actually do the job you’ve been offered.
Gather these documents:
- Copies of your educational certificates, diplomas, or degrees.
- Professional licenses or certifications relevant to the job.
- Letters of reference from previous employers detailing your experience.
Proof of Financial Support
You need to convince the officer you won't become a financial burden on Canada. There isn't a magic number, but you need to show you can cover your living expenses.
Bank statements for the last four to six months are the gold standard here.
Proof of Relationship (If Applicable)
If your spouse or children are coming with you, you'll need to prove your relationship. This means providing marriage certificates and/or birth certificates.
Step 3: Complete and Submit Your Application
With all your documents in hand, it's time to fill out the application. Be meticulous. A single mistake can derail the whole thing.
Most people should apply online. It’s faster, you can upload documents directly, and you avoid courier delays. You’ll use the IRCC secure account portal to submit everything.
Once you've uploaded all documents and paid the fees—which include the $155 CAD processing fee and the $85 CAD biometrics fee—you can submit your application. Double-check everything before you hit that final button.
Step 4: After You Apply
Once you've submitted your application, the waiting begins. But your job isn't quite done.
Biometrics
Nearly everyone needs to provide biometrics (fingerprints and a photo). You'll receive a Biometric Instruction Letter (BIL) after you submit your application and pay the fee. You have 30 days from the date on the letter to give your biometrics at a designated Visa Application Centre (VAC). Book this appointment immediately—don't wait.
Responding to IRCC Requests
Keep a close eye on your email and your IRCC account. If the immigration officer needs more information, they will contact you. You must respond quickly. Missing a request for additional documents is a surefire way to get your application refused.
The Final Decision
You’ll be notified through your account once a decision has been made. If approved, you'll receive a Port of Entry (POE) Letter of Introduction. This is not your work permit, but it's the letter you need to show the officer at the Canadian border to get your actual permit printed.
Leave a Reply