Student Permit Canada Requirements: Your Complete Guide
Securing a Canadian student permit boils down to successfully demonstrating four key things: you have a letter of acceptance from a Designated Learning Institution (DLI), you can prove you have enough financial support, you have a clean background, and you're in good health. Think of that acceptance letter as your golden ticket—it's the first and most critical piece that kicks off the entire application process.
What Are the Core Student Permit Canada Requirements?
Embarking on your Canadian study journey can feel like you're trying to solve a complex puzzle, but once you understand the core pieces, it all starts to click into place. At its heart, Immigration, Refugees and Citizenship Canada (IRCC) is looking to verify a few fundamental things. They want to see that you're a genuine student, that you'll respect Canadian laws, and that you'll head back home after your studies are complete.
Let's break these foundational requirements down into actionable steps. Each one tells a part of your story to the visa officer, painting a picture of a serious and well-prepared applicant.
The Four Pillars of Your Application
Your entire student permit application really rests on four main supports. If any one of them is weak, the whole structure could be at risk of refusal.
-
Acceptance from a Designated Learning Institution (DLI): This isn't just an acceptance from any old school. It must be from an institution officially approved by a provincial or territorial government to host international students. Without a valid Letter of Acceptance (LOA) from a DLI, your application is a non-starter.
-
Proof of Financial Support: You have to prove, in no uncertain terms, that you can cover your first year of tuition fees and all your living expenses. This is non-negotiable. It shows the Canadian government you won’t run into financial trouble or need to rely on public funds while you're studying.
-
Proof of Admissibility: This is all about showing you're not a security risk to Canada. It usually involves getting a police clearance certificate to confirm you don’t have a serious criminal record. You’ll also need to be in good health, which might mean completing a medical examination.
-
Intent to Leave Canada: This is a crucial, and often misunderstood, part of the puzzle. You have to convince the visa officer that you fully intend to leave Canada when your authorised stay is over. The best way to do this is with a compelling Letter of Explanation.
Key Insight: Try to think of your application as a conversation with the visa officer. Your Letter of Acceptance says, "A great Canadian school wants me." Your proof of funds says, "And I can definitely afford it." Your Letter of Explanation says, "I understand the rules and I'm coming to study, with every intention of returning home afterward."
To help you keep these pillars straight, here's a quick summary.
Quick Overview of Key Student Permit Requirements
This table breaks down the fundamental pillars of a successful Canadian student permit application into what they mean for you and the key documents you'll need to provide.
| Requirement Category | What It Means for You | Key Document You Need |
|---|---|---|
| School Acceptance | You must be accepted into a government-approved school before you can even apply. | Letter of Acceptance (LOA) |
| Financial Capacity | You need to show you have the money for tuition and living costs for your first year. | Proof of Funds (e.g., bank statements, GIC) |
| Admissibility | You must prove you are not a security or health risk to Canada. | Police Clearance Certificate & Medical Exam |
| Temporary Intent | You have to convince the officer your main goal is studying and you'll leave after. | Letter of Explanation & Proof of Ties |
Getting these four areas right is the foundation of a strong application.
Demystifying the "Intent to Leave" Requirement
One of the most common reasons I see for refusals is failing to convince the officer of your intent to return home. This concept is officially known as demonstrating "ties to your home country." It’s not about promising you’ll never want to stay in Canada; it’s about proving your primary, immediate purpose for coming is to study.
So, what are strong ties? They can include:
- Family: Close family members like parents, a spouse, or children who are staying behind in Nigeria.
- Financial Assets: Owning property, having investments, or maintaining significant savings back home.
- Job Prospects: A good job waiting for you, or clear career opportunities in Nigeria that your Canadian education will directly unlock.
Your Letter of Explanation is the perfect place to lay all of this out clearly and convincingly. For a deeper dive into the specific documents you'll need to gather, you can explore our detailed guide on Canada student visa requirements. That resource really breaks down how to build a strong case that satisfies immigration officers. Trust me, successfully showing your commitment to returning after your studies is an absolutely non-negotiable part of meeting the student permit Canada requirements.
Understanding the Provincial Attestation Letter (PAL)

One of the biggest recent changes to the Canadian student permit process is the introduction of the Provincial Attestation Letter, or PAL. This is a brand-new document that has become a critical piece of the puzzle for many applicants.
So, what is it? Think of it as an official thumbs-up from the province where your school is located. It’s the province's way of telling the Canadian federal government (IRCC) that they have a spot for you under their new cap on international students. This system was brought in to better manage the number of students arriving, making sure there are enough resources like housing and support services to go around.
For most students aiming for undergraduate or college programmes, getting a PAL is no longer optional—it's a mandatory part of the student permit Canada requirements. If it’s missing from your application, IRCC will simply return it without processing it.
How Do You Get a PAL?
This is where a lot of students get confused, so let’s clear it up right away: you don’t apply for the PAL yourself. Your school handles the entire process.
Here’s how it works. After you receive your Letter of Acceptance (LOA) and officially accept the offer by paying your tuition deposit, your Designated Learning Institution (DLI) gets to work. They will request the PAL directly from their provincial government on your behalf. Once they have it, they'll send it over to you. It's your job to then include this letter with all your other documents when you submit your study permit application.
Key Takeaway: The process is a clear sequence. First, you get your Letter of Acceptance (LOA). Second, your school gets the Provincial Attestation Letter (PAL) for you. Finally, you submit both documents together to IRCC.
This new system essentially makes schools responsible for managing their student numbers within the limits set by their province.
Who Is Exempt from Needing a PAL?
While the PAL is a major new requirement, it doesn't affect every single applicant. It’s really important to check if you fall into one of the exempt categories, as it could save you a lot of time and worry.
You are exempt and do not need a PAL if you are one of the following:
- Master's or Doctoral Degree Students: If you’re applying for a master’s or PhD programme, you’re in the clear.
- Primary and Secondary School Students: Anyone applying to study in kindergarten all the way through to grade 12.
- Visiting or Exchange Students: Students coming to Canada for a term or two as part of an official exchange programme.
- In-Canada Applicants: If you're already in Canada with a valid study permit or work permit and are applying to extend your stay or get a new permit, you do not need a PAL.
- Family Members of Permit Holders: If you're the spouse, partner, or child of someone in Canada who holds a study or work permit.
It's crucial to review this list carefully. If your intended programme—like most undergraduate degrees and college diplomas—isn't on this list, then you must get a PAL through your school. Without it, your application won't move forward.
Alright, you've got your acceptance letter and Provincial Attestation Letter in hand. That’s a huge milestone! Now comes the next big step: putting together all the documents for your study permit application.
Think of it like you're building a case file for the visa officer. Every single document you provide adds another layer of evidence, painting a clear and convincing picture of who you are and why you're a genuine student. Getting this part right is absolutely critical. It’s often the small details here that make the difference between a smooth approval and a frustrating delay.
Let's walk through exactly what you need, piece by piece. We won't just list the items; I’ll explain why each one is so important and what the officer is really looking for.
Your Core Identity and Academic Documents
First up, let's get the foundational paperwork sorted. These are the non-negotiables that prove who you are and confirm your spot at a Canadian school. Every single applicant needs these.
-
A Valid Passport: This is your main ID. It absolutely must be valid for the entire time you plan to be in Canada. Double-check that you have at least one completely blank page (not the last page) for the visa sticker itself. It's also a smart move to scan the bio-data page—the one with your picture and details—along with every page that has a stamp or visa on it.
-
Proof of Acceptance: This is your official Letter of Acceptance (LOA) from your Designated Learning Institution (DLI). It’s the whole reason you're applying! Make sure it clearly states the programme name, how long it runs, the start date, and your tuition fees.
-
Passport-Sized Photographs: Don't just grab any old photo. IRCC is very particular about this. You'll need two identical photos taken within the last six months. They need your name and date of birth written on the back and must meet specific requirements for size and background. Your best bet is to go to a professional studio and specifically ask for photos for a Canadian visa application.
Proving You Can Afford It: Financial Capacity
This is, without a doubt, one of the most closely examined parts of any application. You have to prove, beyond a shadow of a doubt, that you have enough money to cover your first year of tuition and all your living expenses without needing to work illegally. The visa officer needs to be 100% confident you won't struggle financially once you arrive.
Key Takeaway: Proving your finances isn't just about showing a bank account with a lot of money in it. It's about demonstrating a clear, logical, and legitimate source for those funds. A large, unexplained deposit right before you apply is a major red flag for visa officers.
You'll need a combination of documents to build a strong financial profile. To get the full picture on the specific amounts required and the best evidence to use, take a look at our detailed guide on preparing your proof of funds for Canada. It’s packed with strategies for presenting your finances in the most convincing way.
Telling Your Story with a Letter of Explanation
Your Letter of Explanation (LOE), sometimes called a Statement of Purpose, is your one chance to speak directly to the person reviewing your file. This is where you connect all the dots and turn your pile of documents into a compelling story. A well-written LOE is an incredibly powerful tool.
In this letter, you need to clearly explain:
- Why you chose Canada and this specific programme: Show how this course logically follows your past education and how it will help your future career goals back in Nigeria.
- Your overall educational goal: Briefly lay out your academic plan.
- That you understand your responsibilities: This is crucial. You must state that you know you have to leave Canada when your studies are done. You can strengthen this point by talking about your "ties to home"—things like family, property, or solid job prospects waiting for you in Nigeria.
The Biometrics Requirement
Finally, nearly every applicant from Nigeria will need to provide biometrics, which is just a fancy way of saying your fingerprints and a photo. It’s a mandatory security step to confirm your identity.
- Who Needs It? Pretty much every applicant for a study permit who is between 14 and 79 years old.
- What's the Cost? The fee is currently $85 CAD for an individual.
- How it Works: After you've submitted your application and paid all the fees online, you will receive a Biometric Instruction Letter (BIL). You then have to book an appointment at a designated Visa Application Centre (VAC) to get your fingerprints scanned and photo taken.
Taking the time to get these documents organised and presented correctly shows the visa officer that you're a serious, well-prepared candidate. It really is the key to a smoother application journey.
A Step-by-Step Guide to the Application Process
Alright, you’ve gathered all your documents and have them neatly organised. Now it's time for the main event: submitting your study permit application. This is where all your hard work and preparation truly pay off. While it might feel a bit daunting, the process is actually just a series of clear, manageable steps.
The best way to think about the IRCC online portal is as your personal command centre. It’s the single place where you'll create your account, upload every document, and keep tabs on your application's journey from beginning to end. Let's walk through it together.
Kicking Off Your Online Application
These days, almost everyone applies online, and for good reason—it’s quicker and makes tracking your progress a whole lot easier. Your journey starts with creating a secure IRCC account, which becomes your direct line of communication with Canadian immigration officials.
Once you’re in, the system will walk you through an eligibility questionnaire. This clever tool is designed to create a personalised document checklist based on your specific situation. It is absolutely vital to answer these questions carefully and honestly, as they determine precisely what you need to upload to meet all the student permit Canada requirements.
With your unique checklist in hand, you'll start filling out the required application forms. These are usually PDF files that you'll download, complete, validate (a crucial step within the form itself), and then upload back to your portal. Don't rush this part. Double-check every single detail before you move on.
Online vs. Visa Application Centre (VAC)
While the online route is the standard, some applicants might need or simply prefer to apply in person at a Visa Application Centre (VAC). Let’s break down the differences.
-
Online Application:
- Pros: You can submit your application 24/7 from anywhere in the world. This method saves on courier fees, and processing is generally faster. Plus, you get updates sent straight to your IRCC account.
- Cons: You’ll need a stable internet connection and access to a scanner to create clear digital copies of your documents.
-
VAC Application (Paper-Based):
- Pros: The staff at the VAC can help review your application package to make sure it's complete before it gets sent off. It’s a solid choice if you're not entirely comfortable with technology.
- Cons: Processing often takes longer. You'll need to travel to a VAC, and you may have to pay additional service fees.
For the vast majority of people, applying online is the most sensible and efficient path. If you're looking for a more detailed walkthrough, our guide on how to apply for a student visa offers extra tips for navigating the forms and submission process.
This simple flowchart lays out the core journey of your application, from getting your documents ready to receiving that final decision.
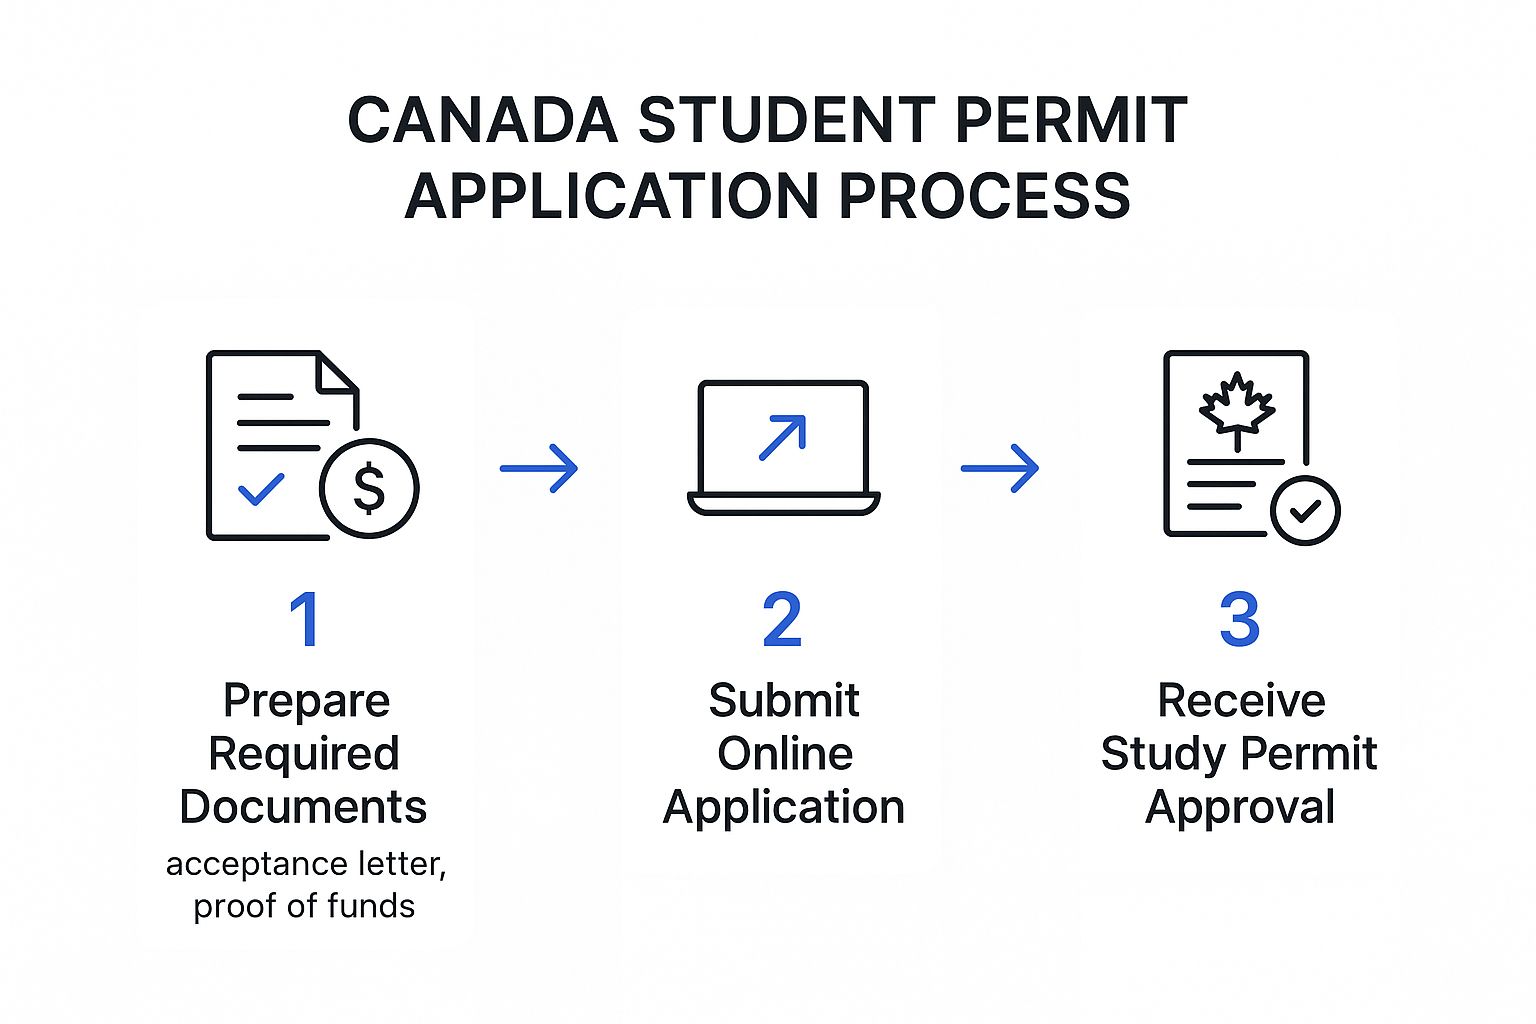
As you can see, the whole thing is a logical sequence. It all starts with solid preparation and, hopefully, ends with a successful approval.
Paying Fees and Final Submission
Once every form is filled out and all your documents are uploaded, you’re on the home stretch. The last thing to do before submitting is to pay the required fees. There are two distinct fees you'll need to cover:
- Application Processing Fee: This is the standard charge for IRCC to review and assess your study permit application. It's currently $150 CAD.
- Biometrics Fee: This fee covers the cost of collecting your fingerprints and photograph, which is currently $85 CAD.
You'll handle these payments directly on the IRCC portal with a credit or debit card. Once your payment goes through, you can officially click that "submit" button. A huge congratulations is in order—your application is now with IRCC!
Important Note: Hitting 'submit' is a massive milestone, but you're not quite finished. You should receive a Biometric Instruction Letter (BIL) in your IRCC account within 24 hours. You must use this letter to book an appointment at a VAC to give your biometrics. Your application won't move forward until this is done.
After you've completed your biometrics appointment, the real waiting game begins. You can keep an eye on things by logging into your secure IRCC account. You’ll see status updates as your file progresses through the system, which helps provide some peace of mind and keeps you in the loop.
How Student Permit Caps and Allocations Affect You
Getting your head around the individual student permit Canada requirements is just the first step. You also need to understand the bigger picture your application fits into: a national system of caps and allocations that can make or break your chances.
Think of it like trying to buy a ticket for a sold-out concert. It’s not enough to just have the money. Your success also hinges on how many tickets are available in total and, crucially, how many have been set aside for your specific city or venue.
Canada recently put a national cap on new study permits to better manage the growth of its international student community. This was done to make sure provinces have enough resources—like housing and support services—to properly care for everyone.
The National Cap and How It Works
This system sets a firm limit on how many study permits can be approved each year. These available spots are then divided up among the provinces and territories, but it's not an even split. Some provinces get a larger share, while others have seen their numbers cut back.
What does this mean for you? It means the province you choose to study in now matters more than ever. A fantastic application for a school in a province with very few spots will face much tougher competition than the exact same application for a school in a province with more permits to give out.
Key Takeaway: Choosing your province has become a strategic move. It's no longer just about picking a great school or programme; it's also about looking at the provincial allocation numbers and thinking about how they might impact your application.
How Different Student Groups Are Affected
The cap isn’t a one-size-fits-all rule. It’s designed to affect different groups of students in different ways, and it's vital you understand where you fit in. For example, if you're applying for a master's or doctoral (PhD) programme, the rules for you are often different from those for someone applying to an undergraduate degree or college diploma.
This is a very deliberate strategy. By creating specific allocations for various educational levels, the Canadian government can prioritise the types of students it wants to attract. For instance, in 2025, the government set a total cap of 437,000 study permits, a 10% drop from the year before. A certain portion of that number is specifically reserved for graduate students, signalling a clear focus on attracting people for advanced research. You can learn more by reading the breakdown of these permit allocations on CIC News.
This targeted approach means your level of study plays a massive role in how the cap affects you.
- Graduate Students (Master's & PhD): These students are largely shielded from the cap and are often exempt from needing a Provincial Attestation Letter (PAL). The government sees this group as a high priority.
- Undergraduate & College Students: This is the biggest group and feels the most direct impact from provincial caps and the PAL requirement. Competition here is much fiercer.
- Primary & Secondary Students: Younger students are completely exempt from the cap and do not need a PAL to study in Canada.
Knowing exactly which category you belong to is powerful. It gives you a clear-eyed view of the hurdles and advantages you'll face, turning you into a much more informed and strategic applicant.
Finding Opportunity in Regional Permit Differences

The recent changes to provincial allocations for study permits have completely shaken up the application landscape. The best way to think about it is this: instead of one massive, single-file line to get into Canada, there are now thirteen separate lines—one for each province and territory. And here's the crucial part: some of those lines are a whole lot shorter and moving much faster than others.
For a savvy applicant, this shift is a massive opportunity. While the traditional student hotspots like Ontario and British Columbia are facing cuts to their permit numbers and becoming more competitive, other provinces are practically rolling out the welcome mat. They have more spots to fill and are genuinely eager to attract international talent.
This isn't just a random shuffle, either. It’s a strategic move by the Canadian government to address real-world issues. Provinces with booming economies and specific labour shortages are now using their increased permit allocations to draw in students who can fill those critical gaps. It’s a win-win, as it also helps take the pressure off housing and public services in major hubs like Toronto and Vancouver.
Capitalising on Provincial Allocations
If you're flexible about where you study, this knowledge is your secret weapon. Instead of setting your sights only on the most famous universities, you can strategically target provinces where your chances of securing a permit are simply better. Suddenly, your application's success isn't just about your academic record; it's also about the smart, strategic choice of where you apply.
The numbers really paint a clear picture. The provincial breakdown for 2025 study permits varies dramatically, showing which regions need students most. For example, while Ontario, British Columbia, and Nova Scotia saw significant reductions, others got a major boost. Newfoundland and Labrador received nearly triple their 2024 allotment, and the Northwest Territories more than doubled theirs. For a full breakdown, it's worth exploring a detailed forecast of these Canadian study permit volumes.
Key Insight: Applying to a school in a province with a higher permit allocation can be one of the smartest moves you make. It’s like choosing to fish in a well-stocked pond instead of an overfished one—your odds of success are simply better.
Provinces to Watch
So, where are these new student hotspots? Based on the latest allocation numbers, you should be paying close attention to the provinces that have seen a major increase in their quotas.
- Alberta: This province has received a notable boost, which makes perfect sense given its strong economic growth and high demand for skilled workers in the tech and energy sectors.
- Saskatchewan: Much like its neighbour, Saskatchewan is actively trying to attract and retain new talent to fuel its growing economy, making it an incredibly welcoming place for students.
- Newfoundland and Labrador: This province saw one of the most dramatic increases, signalling a serious push to bring in international students to help grow its population and workforce.
By looking beyond the usual big names, you're not just reacting to the new student permit Canada requirements—you're using them to your advantage. Choosing a province that is actively looking for students just like you can make all the difference, turning a daunting process into a real strategic opportunity.
Got Questions? We've Got Answers
It's completely normal to have a million questions swirling around as you get ready to apply for your Canadian study permit. Let's tackle some of the most common ones that pop up, so you can move forward with confidence.
Probably the biggest question on everyone's mind is, "Can I work in Canada while I study?" The short answer is yes, but with a few rules. Your study permit will state if you're allowed to work. If it does, you can generally work up to 20 hours per week while your classes are in session and then full-time during scheduled breaks, like your summer or winter holidays.
This is a fantastic way to get some Canadian work experience on your CV, but remember, immigration officials don't see this as your main source of income. Your proof of funds needs to show you can support yourself without it.
What if My Study Permit Application Is Refused?
Getting a refusal notice can feel like a punch to the gut, but don't panic. It's often not the final word. The very first thing you need to do is read the refusal letter from top to bottom. The visa officer is required to tell you exactly why they weren't convinced.
Most refusals boil down to a few common issues: not providing enough financial proof, the officer not believing you'll return home after your programme, or missing documents. Once you've pinpointed the problem, you can figure out your next move.
You generally have two paths forward:
- Submit a New Application: This is the most common route. You'll need to gather stronger documents or new information that directly addresses the officer's concerns before you apply again.
- Ask for a Reconsideration: This is a bit more niche. If you can prove the officer made an obvious mistake based on the information you provided (like misinterpreting a document), you can write a letter asking them to take a second look.
Expert Tip: The worst thing you can do is rush to re-apply with the exact same documents. If you don't fix the weak spots, you'll likely get the same result. Take a step back, figure out how to make your case stronger, and then try again.
Can I Bring My Family to Canada?
Many students hope to bring their spouse or children along, and the good news is, you often can. Your spouse or common-law partner can typically apply for an open work permit. This is a huge plus because it allows them to work for almost any employer in Canada while you study.
Your dependent children can come with you too. They can usually enrol in Canadian primary or secondary schools without needing a separate study permit of their own. The key is to submit their applications at the same time as yours and clearly outline your family's plans in your Letter of Explanation.
Trying to figure out Canadian immigration rules can feel overwhelming, but you're not in it alone. JapaChat is Nigeria’s AI immigration expert, built to give you quick, reliable answers to all your questions. You can get personalised advice on visa requirements, your documents, and the best path for you just by starting a chat. Plan your journey with real clarity by visiting the JapaChat website.
Leave a Reply