Student Visa Canada: Easy Guide to Your Application Process
Your journey to studying in Canada really kicks off with two key documents: your Letter of Acceptance (LOA) and, for most students now, a Provincial Attestation Letter (PAL). Think of these as your golden tickets. Without them, you can't even start the main application with Immigration, Refugees, and Citizenship Canada (IRCC).
Laying the Groundwork for Your Study Permit Application
Before you start picturing yourself on a Canadian campus, you need to get the foundational paperwork sorted. This first stage is all about securing the right documents from the right institutions, a process that has a few more layers now thanks to recent policy updates.
It all starts with getting that Letter of Acceptance (LOA) from a Canadian school. But here's the crucial part: it can't be just any school. It absolutely must be a Designated Learning Institution (DLI). A DLI is a college or university that has been officially approved by a provincial or territorial government to host international students. Applying to a non-DLI school is a guaranteed dead end—your student visa application will be rejected right away.
Expert Tip: Before you even pay an application fee, double-check your chosen school's DLI status on the official Government of Canada website. This simple step can save you a world of time, money, and disappointment.
The Two Most Important Letters
Once you have your LOA in hand, there’s a new hurdle for most people applying for undergraduate or college programmes: the Provincial Attestation Letter (PAL). This is a fresh requirement introduced in 2024. Its purpose is to confirm you have a spot allocated to you under a specific province's cap for international students.
Don't worry too much about the logistics here; your DLI is your guide. After they send you an LOA, they will provide instructions on how to get your PAL.
These two documents are a team:
- Letter of Acceptance (LOA): This is your proof of admission. It confirms you’ve been accepted into a specific programme at a DLI and will detail things like your course, how long you'll be studying, and your tuition fees.
- Provincial Attestation Letter (PAL): This letter comes from the province or territory and confirms your spot is reserved under their student intake limit. It’s the government’s way of managing the number of new students arriving.
Understanding the New Student Caps
So, why the new PAL requirement? It's directly linked to a major policy change. The Canadian government has put caps on the number of new study permits it issues each year. This is a massive development for applicants, especially those from countries like Nigeria that send a lot of students to Canada.
For instance, in 2025, IRCC plans to approve a maximum of 437,000 study permits, which is a 10% reduction from the 2024 cap. The government’s goal is to ease pressure on housing and other social services, but for you, it means the competition is fiercer than ever. You can find more analysis on these projected numbers on platforms like ApplyBoard.
This shift means that simply meeting the minimum requirements might not be enough anymore. Your application needs to be strong, complete, and compelling to stand out.
To give you a clear starting point, here’s a breakdown of the foundational documents you absolutely must have before you even think about filling out IRCC forms.
Essential Document Checklist Before You Apply
This table summarises the non-negotiable paperwork you need to secure before beginning the formal visa application process. Getting these documents in order is your first and most important task.
| Document | What It Proves | How to Obtain It |
|---|---|---|
| Letter of Acceptance (LOA) | You have been admitted to a specific programme at an approved school. | Apply directly to your chosen Designated Learning Institution (DLI). |
| Provincial Attestation Letter (PAL) | Your spot is confirmed under the provincial allocation limit. | Your DLI will provide instructions on how to request this after issuing the LOA. |
| Valid Passport | Your identity and legal ability to travel internationally. | Issued by your home country's government. Ensure it's valid for your entire study period. |
Once you have these three core documents ready, you'll have built a solid foundation and can confidently move on to the next stages of your study permit application.
Showing IRCC You Have the Funds to Succeed
So, you’ve got your acceptance letter. Fantastic! Now comes what is often the most critical part of your student visa application: proving you have the financial stability to support yourself in Canada.
Let's be clear: IRCC visa officers are meticulously trained to review financial documents. They need to see, without a doubt, that you can cover your tuition, living expenses, and travel without any financial struggles. It’s not just about hitting a minimum number; it's about telling a credible and consistent story with your money.
They’re looking for a clear financial history. Where did the money come from? How long has it been sitting in the account? A massive, last-minute deposit just before you apply is a huge red flag. To them, it screams that the money might have been borrowed just to pass the check and isn't genuinely yours for your education.
What Strong Proof of Funds Actually Looks Like
Your main goal is to present a financial case that’s both rock-solid and easy for the visa officer to understand. While you can submit various documents, some definitely carry more weight than others. The best approach is to provide a mix of primary documents supported by other evidence to paint the full picture.
Here are the heavy hitters:
- Bank Statements: You'll need to show statements from the last four to six months. What officers want to see is a stable, healthy balance over time, not a sudden jackpot. Make sure the statements clearly display the account holder's name and the bank's official contact information.
- Guaranteed Investment Certificate (GIC): For many students, this is the gold standard. Buying a GIC of at least $20,635 CAD (the 2024 figure for a single student outside Quebec) from a participating Canadian bank is a direct way to prove you've already parked your first year's living expenses in Canada. It's incredibly convincing.
- Scholarship or Funding Letters: If you've been awarded a scholarship or your university is providing funding, that official letter is a key piece of your puzzle. It needs to spell out the exact value of the award and precisely what it covers (e.g., tuition, stipend).
A classic rookie mistake is just submitting one bank statement showing the final balance. That's not enough. Visa officers need the story behind the money. A consistent pattern of savings over several months is always more persuasive than a large lump sum that shows up out of nowhere.
Building Your Financial Story with Supporting Evidence
Think of your GIC or bank statements as the main characters in your financial story. Supporting documents are the crucial backstory that helps the visa officer connect all the dots.
You should seriously consider including these if they apply to your situation:
- Sponsorship Documents: Is a family member funding your studies? You absolutely need a formal sponsorship letter or a signed Affidavit of Support. This isn't just a letter, though. It must be backed by their financial documents—think bank statements, pay stubs, business registration, and tax documents.
- Proof of Income: This goes for you or your sponsor. Gather employment letters that state salary, pay stubs from the last few months, or if self-employed, business registration papers and recent tax returns.
- Proof of Property or Investments: Owning property or having other significant investments shows deep financial roots and strong ties to your home country, which is something visa officers look for.
For an even deeper dive into the specific documents you'll need, check out our complete guide on how to prepare your proof of funds for Canada.
Common Money Mistakes That Can Sink Your Application
A simple slip-up in your financial documents can unfortunately lead to a quick refusal. Be obsessive about the details and steer clear of these common traps.
| Mistake to Avoid | Why It's a Problem | How to Fix It |
|---|---|---|
| Large, Sudden Deposits | This immediately makes an officer suspicious that the funds are borrowed just for the application. | Make sure the money has been in the account for at least 4-6 months. If a large deposit was unavoidable (like from selling a property), you must include official sale documents to prove its origin. |
| Inconsistent Information | Names, dates, or amounts that don't match across your documents create confusion and erode trust. | Triple-check everything. The name on the bank account must perfectly match the name on the sponsorship letter. No exceptions. |
| Relying on a Single Document | Just providing a letter from your bank stating your balance is rarely enough on its own. | Build a layered file. Combine bank statements with proof of income, sponsorship letters, and maybe even a GIC to create a full, believable financial package. |
At the end of the day, your financial proof has to convince the visa officer of two main things: you have more than enough money for your entire stay, and you have strong economic reasons to return home when your studies are done. A clear, well-documented, and honest financial history is your ticket to getting this right.
Getting to Grips With the Online IRCC Application Portal

Alright, you’ve got your acceptance letter, your PAL is sorted, and you've organised your proof of funds. Now it’s time to move everything online and tackle the official Immigration, Refugees, and Citizenship Canada (IRCC) portal. I know it can look a bit intimidating at first, but honestly, it’s just a digital filing cabinet where you'll upload your documents for the visa officer.
First things first, you'll need to create a secure IRCC account. This account becomes your command centre for the entire application. It’s where you’ll fill out the necessary forms, upload your life’s paperwork, pay the fees, and most importantly, get updates on your application's progress. Take your time setting it up and write down your login details somewhere safe—you'll be visiting this portal a lot.
The heart of the application is the Application for Study Permit Made Outside of Canada (IMM 1294) form. This is where you’ll provide all your personal, educational, and background details. Let me be clear: accuracy is everything. A simple typo or a date that doesn't match another document can raise a red flag and lead to frustrating delays.
From my experience, I've seen applicants get tripped up by rushing the IMM 1294 form. Treat every single question with care. For instance, when it asks for your travel history, be completely honest and thorough. Forgetting to mention a trip, even a short one, can be seen as an attempt to hide something, which really hurts your credibility with the visa officer.
Getting Your Documents Ready for Upload
Before hitting submit, you need to get all your supporting documents digitised. IRCC is very particular about file formats and sizes. You can't just snap a quick, blurry photo on your phone and hope for the best.
Every file has to be crystal clear, easy to read, and named properly. A blurry bank statement or a passport page with the edges cut off is an instant rejection. This is where your attention to detail will really make a difference.
Here’s a quick checklist to follow:
- File Type: Stick to PDF for almost everything. For your photo, a JPEG is fine.
- File Size: Make sure each individual file is under 4 MB. You might need to use an online tool to compress bigger files, but double-check that the quality doesn't suffer.
- Labelling: Name your files clearly so you (and the visa officer) know what they are. Something like "Adekunle-Proof-of-Funds.pdf" or "Adekunle-LOA.pdf" works perfectly.
Getting your files right from the start saves you the headache of submission errors later on. For a more detailed breakdown of the application steps, our guide on how to apply for a student visa offers some extra pointers.
The Biometrics Requirement
Just about everyone applying for a Canadian student visa, including Nigerians, needs to provide biometrics. This is a non-negotiable step where you'll get your fingerprints scanned and a photo taken at an official Visa Application Centre (VAC).
You'll pay the biometrics fee, which is $85 CAD per person, at the same time you submit your online application. Once that payment goes through, IRCC will send you a Biometric Instruction Letter (BIL). You cannot book your VAC appointment without this letter. Don't even try.
These appointments can get booked up fast, especially during peak seasons, so schedule yours as soon as you receive that BIL. Your application simply won't be processed until your biometrics are on file.
Submission, Waiting Times, and Tracking Your Progress
Once every form is filled out and every document is uploaded, take a deep breath and do one final review. This is your last chance to spot any mistakes. After you’ve submitted everything and paid all the fees (both the application and biometrics fees), your application is officially in the system.
Processing times can be all over the place, depending on how many applications IRCC is dealing with at that moment. You can check the latest average times on the IRCC website, but take them with a grain of salt—they are just estimates. Some applications fly through, while others take a bit longer.
After you've submitted, your IRCC secure account is your best friend. All updates, messages, and requests for more information will come through there, right up to the final decision on your student visa for Canada. Check it regularly so you don’t miss anything important. I know the waiting period is tough, but being well-prepared and organised gives you the best shot at a smooth and successful outcome.
Writing a Persuasive Statement of Purpose
Think of your Statement of Purpose (SOP) as your personal conversation with the visa officer. Your acceptance letter and bank statements show the facts, but your SOP—sometimes called a letter of explanation—tells your story. It’s your one real chance to explain the why behind your application and prove you’re a genuine student with a solid plan.
A weak SOP is generic. It’s full of vague praises like, "I want to study in Canada because it has a great education system." A strong SOP, on the other hand, connects the dots. It answers the questions the visa officer is thinking: Why this specific programme? Why this university over all others? How will this Canadian degree actually help your career back in Nigeria?
A compelling letter can genuinely make or break your student visa canada application.
How to Structure Your Narrative for Impact
Don't just list your achievements like a resume. Your SOP needs to be a persuasive essay. Visa officers read hundreds of these, so yours must be clear, sincere, and easy to digest.
Here's a simple way to frame your story:
-
The Hook (Your Introduction): Get straight to the point. State the exact programme and university you’ve been accepted into. No need for fancy introductions; direct and professional is the way to go.
-
The Connection (Your Academic and Career Goals): This is the heart of your letter. Show how your past studies and work experience naturally lead to this Canadian programme. For instance, if you have a computer science degree from Nigeria and you're applying for a Master's in Cybersecurity, explain that. Talk about the booming Nigerian tech scene and the specific skills this Master's will give you to land a great job when you get back.
-
The "Why Canada?" Justification: Get specific. Don't just say Canada is great. Did you choose the university because of a particular professor's research? Does it have a unique lab or a co-op programme that offers experience you can't find anywhere else? Mention it!
-
The Return Ticket (Your Ties to Home): This is non-negotiable and incredibly important. You have to convince the officer that you have every intention of returning to Nigeria after you graduate.
Proving You Intend to Return Home
Visa officers are trained to look for red flags here. You need to show them you have strong roots—or "ties"—in your home country that will pull you back after your studies are complete. Just saying, "I promise to return to Nigeria," isn't nearly enough. You need to show them.
Here’s what solid proof of ties looks like:
-
Financial Ties: Do you or your family own property? Have investments? Is there a family business waiting for you? If so, state it clearly. For example: "My family runs a growing logistics firm in Lagos, and this degree in supply chain management is a crucial part of our plan for me to assume a leadership role upon my return."
-
Family Ties: Talk about your immediate family responsibilities. If you have a spouse and children in Nigeria, or if you are the primary caregiver for your parents, these are powerful reasons to come back.
-
Career Ties: The best evidence is a clear career path back home. If you can get a letter from a Nigerian company showing interest in hiring you after graduation, that’s gold. It shows the visa officer you have a concrete plan.
A huge mistake I see applicants make is focusing too much on how wonderful Canada is. It sounds positive, but it can accidentally make it seem like you want to stay forever. Your goal is to strike a delicate balance: show that Canada is the absolute best choice for this specific education, and then explain how you'll use that education to build an amazing career back home in Nigeria.
To get your SOP just right, you might find it helpful to use AI essay analysis tools for a final polish. They can spot awkward phrasing or gaps in your logic before you submit. Ultimately, you want to leave the visa officer with a clear, compelling story and no doubt that you are a genuine student.
Navigating the New Landscape: Policy Changes and Provincial Quotas
If you’re planning to get a student visa for Canada, you need to know that the game has changed. You've probably heard the buzz about the new study permit caps and the Provincial Attestation Letter (PAL) system. These aren't just minor adjustments; they've completely reshaped how applications are handled, making the entire process more competitive.
It’s no longer enough to just tick the boxes for basic eligibility. The Canadian government has implemented a national cap on new study permits, with each province receiving a specific allotment. What this means for you is that some provinces now have significantly fewer spots for international students than they used to.
Suddenly, your choice of province and school has become a crucial part of your application strategy.
The New Reality of Provincial Allotments
The introduction of these caps has created a whole new layer of competition. Provinces like Ontario and British Columbia, traditionally the most popular destinations, have seen their allocations cut dramatically. This has a direct, real-world impact on your chances of getting a PAL from a school in those areas.
On the other hand, some provinces might have more available spots compared to their usual number of applicants. This doesn’t mean it's "easy" to get in somewhere else, but it does signal that you should be thinking more broadly about where you want to study.
- High-Demand Provinces (e.g., Ontario, British Columbia): The fight for a PAL here is intense. Your application needs to be absolutely perfect, and you must apply to your chosen Designated Learning Institution (DLI) as early as you possibly can.
- Provinces with More Capacity (e.g., Alberta, Saskatchewan): These regions could be a smart, strategic choice. They're keen to attract international talent and may have more PALs to issue.
The numbers tell a compelling story. After a 29% jump in international student numbers from 2022 to 2023, Canada experienced a 4% drop by the end of 2024. Data from early 2025 shows the number of study permit holders fell by about 11% compared to the same time last year. The biggest hits were in Ontario and British Columbia—provinces that have always been favourites among Nigerian students. For a deeper dive, you can explore the full report on study permit figures.
This new system makes it absolutely vital to understand every single requirement. For a complete checklist, make sure you review our detailed guide on the current Canada student visa requirements.
The bottom line is this: your application strategy must now factor in provincial needs and quotas. A fantastic applicant targeting a competitive programme in Ontario could face a much tougher battle than an equally strong applicant who chooses a similar course in a province with more room for international students.
The table below breaks down how these new caps are playing out across different provinces, giving you a clearer picture of the current landscape.
Provincial Allotment Trends for Study Permits
| Province | Traditional Popularity | Recent Allotment Trend | Implication for Applicants |
|---|---|---|---|
| Ontario | Very High | Significant reduction in PALs | Extremely competitive; apply early to multiple DLIs. |
| British Columbia | High | Major reduction | Similar to Ontario, competition is fierce. Backup plans are essential. |
| Alberta | Moderate | Increased capacity | A strategic choice; potentially higher chance of receiving a PAL. |
| Saskatchewan | Growing | Favourable allotment | Good option for those looking outside traditional hubs; less competition. |
These trends show that thinking beyond the usual "go-to" provinces could be a very smart move in the current climate.
And that's not all. The infographic below shows how processing times can vary based on where you're applying from, adding another layer to your planning.
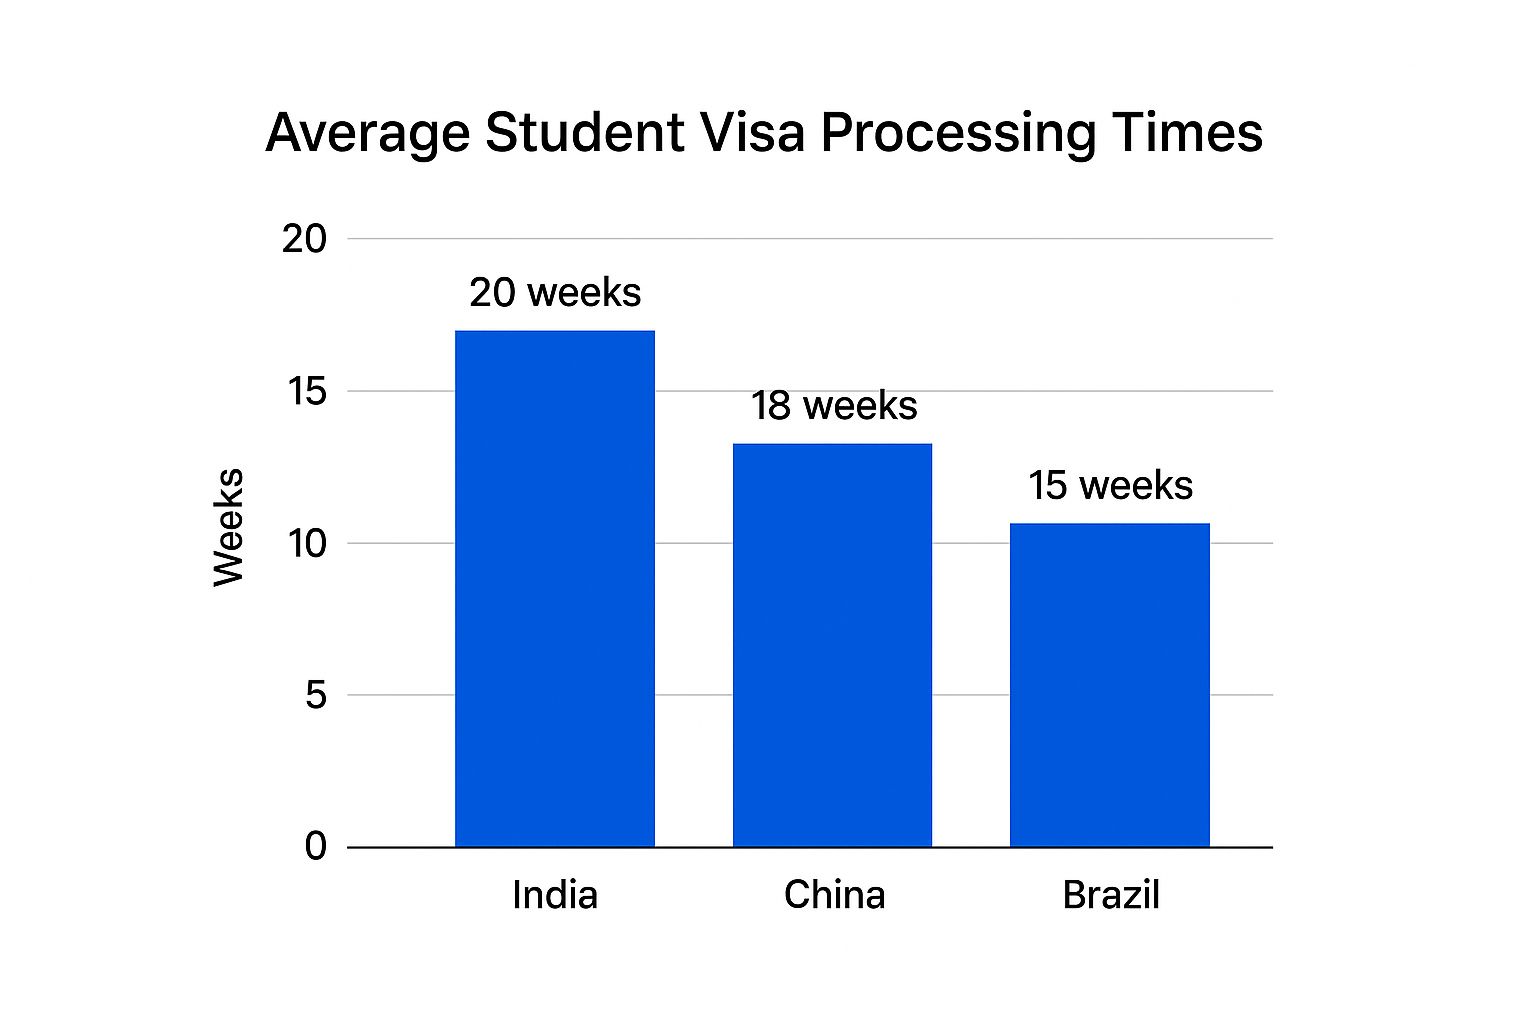
As you can see, wait times aren't the same for everyone. This really drives home the importance of applying well ahead of time, no matter your country of origin.
How to Adapt Your Application Strategy
In this tighter, more regulated environment, being proactive and well-informed is your greatest asset. You can't just pick a school and hope for the best anymore. You have to think like a strategist.
First off, do your homework on provincial priorities. Some provinces are actively seeking students with skills in specific fields like healthcare, tech, or agriculture. If you can align your programme choice with these local needs, you might just make yourself a more desirable candidate for a PAL.
Next, build a solid backup plan. It's incredibly wise to apply to DLIs in more than one province. This diversifies your options and seriously boosts your chances of getting an acceptance letter and a PAL from at least one of them.
Finally, obsess over the details. With fewer spots up for grabs, there is zero room for error. Your statement of purpose, proof of funds, and every supporting document must be crystal clear, convincing, and complete. In this new era, every single detail matters more than ever before.
Common Questions About the Canada Student Visa Process

Even with a perfectly prepared application, it’s completely normal to have some lingering questions. The journey to studying in Canada can feel complex, and let's be honest, the rules can change. Here, we'll tackle some of the most frequent concerns I see from students, aiming to give you clarity and confidence as you move forward.
Navigating the ins and outs of a student visa canada can be tricky, so let’s clear up a few of the most common points of confusion.
What Should I Do If My Student Visa Application Is Refused?
First, take a breath. Seeing a refusal letter is disheartening, I know, but it’s rarely the end of the road. The letter you receive from IRCC will give you the official reasons for their decision. Often, it comes down to a few key areas: concerns about your proof of funds, doubts about your intention to return home after your studies, or a simple case of incomplete documents.
Whatever you do, don't just resubmit the same application. That's a recipe for a second refusal. Your first step is to carefully analyse the refusal grounds. For a much deeper insight, you can file an Access to Information and Privacy (ATIP) request to see the visa officer's actual notes. This is a game-changer because it gives you a clear roadmap of exactly what to fix.
Once you understand the weak points, you can focus on gathering stronger evidence and writing a much more compelling letter of explanation that directly addresses those specific concerns before you reapply.
Can I Work in Canada on a Student Visa?
Yes, absolutely—and this is a major advantage for many international students. If you’re a full-time student with a valid study permit, you’re generally allowed to work off-campus for up to 20 hours per week during regular school terms. Better yet, during scheduled breaks like the summer or winter holidays, you can work full-time.
Your study permit itself will clearly state if you are eligible to work. For most academic programmes, you won't need to apply for a separate work permit. This is a fantastic opportunity to gain Canadian work experience and help with your living costs. Just remember, your main reason for being in Canada must always be your studies.
A key thing to remember is that your right to work is tied directly to your full-time student status. If you drop to part-time studies, you lose your eligibility to work off-campus. Staying enrolled and in good academic standing is non-negotiable.
How Do the New Visa Caps Affect My Application Strategy?
This is a big one. The recent introduction of study permit caps has really cranked up the competition, especially for applicants from high-volume countries like Nigeria. With fewer spots available overall—and particularly in popular provinces like Ontario—your application strategy is more critical than ever before.
These caps directly impact Nigerian students. For instance, the 10% nationwide cut in study permits for 2025 means that fewer Nigerian applicants will get the green light compared to previous years. This is because provinces they often favour, like Ontario and British Columbia, have faced the biggest reductions in their allocations. You can read more about these provincial numbers on the Government of Canada's official news site.
This new reality demands a much smarter approach. Here’s what you need to do:
- Broaden Your Horizons: Don't just focus on Toronto or Vancouver. Seriously consider applying to excellent institutions in provinces with more favourable quotas, like Alberta or Saskatchewan.
- Perfect Your Application: There is simply no room for error now. Your statement of purpose and proof of funds have to be flawless and completely convincing.
- Act Quickly: The Provincial Attestation Letter (PAL) system adds a new, crucial step. Apply to your chosen DLI as early as you possibly can to get your place in the queue for a PAL.
Your ability to adapt to this more competitive environment will be a key factor in your success.
Feeling overwhelmed by the visa process? JapaChat is Nigeria's AI immigration expert, designed to give you instant, accurate answers to your most pressing questions. Plan your move with confidence and avoid costly mistakes. Get started for free today at JapaChat.
Leave a Reply