Apply for Study Visa Canada from Nigeria | Expert Guide
Getting your Canadian study visa from Nigeria isn't just about gathering a pile of documents at the last minute. It's a journey, and like any big trip, it starts with a solid plan. Your first two moves are absolutely critical: making sure you're eligible in the eyes of Immigration, Refugees and Citizenship Canada (IRCC) and, most importantly, getting that acceptance letter from a Canadian school.
Think of these as the foundation of your entire application. Without them, nothing else matters.
Starting Your Canadian Study Visa Journey
So, where do you actually begin? Forget about bank statements or writing your life story in an SOP for a moment. The real starting line for any Nigerian student is securing two key documents: the Letter of Acceptance (LOA) and the newer Provincial Attestation Letter (PAL).
Without an LOA from a Designated Learning Institution (DLI), you don't have a reason to apply for a study permit. It’s that simple. This letter is the official proof from a Canadian school saying, "Yes, we want this student in our programme." It's your golden ticket.
First Things First: Get Your Letter of Acceptance
Your first mission is to research and apply to Canadian schools on the official DLI list. Don’t just pick the first one you see. Find a programme and an institution that genuinely fits your career ambitions.
Each school has its own set of rules, deadlines, and application quirks. For instance, if you're an aspiring engineer from Lagos, you'll likely need to submit your WAEC results, transcripts from your university or polytechnic, and proof you can handle English, like an IELTS score. You have to apply directly to the school and get through their admissions process before they’ll issue that all-important LOA.
Expert Tip: Pour as much effort into your school application as you do your visa application. A strong, well-put-together application gets you accepted faster, which means more precious time to nail the visa part.
The New Hurdle: The Provincial Attestation Letter
One of the newest and most crucial requirements is the Provincial Attestation Letter, or PAL. This is a letter from the province or territory where your school is located. It basically confirms you have a guaranteed spot under their yearly cap for international students. You cannot apply for a study visa without it.
The good news? You don't have to chase this one down yourself. Once the school accepts you and you've paid your tuition deposit, the school requests the PAL from the provincial government for you. They’ll send it to you once they get it. This system was brought in to better manage the flow of students into each province. For a complete rundown of the entire process, you can explore our detailed guide on how to apply for a student visa.
This change is part of a bigger picture. The Canadian government is adjusting its policies, with plans for 2025 to issue a total of 437,000 study permits. That's a 10% drop from the 2024 target, aimed at easing the strain on housing and other services. As you get ready, looking at broader advice for students traveling abroad can provide context beyond just the visa paperwork.
At the end of the day, getting your LOA and PAL aren't just boxes to tick. They are the core of your application for a study visa canada. They prove to IRCC that you’re a serious, well-prepared student they want in their country.
Gathering Your Essential Application Documents
Alright, you’ve got your Letter of Acceptance and the crucial Provincial Attestation Letter. Well done! Those are the biggest hurdles. Now, it's time to meticulously assemble the rest of your application package. Think of yourself as building a case for the visa officer; every single document needs to be authentic, clear, and perfectly organised to tell your story convincingly.
This isn’t just a simple box-ticking exercise. For a Nigerian student applying for a study visa to Canada, the way you present your documents can make or break your application. A messy, incomplete, or confusing file is an immediate red flag. Your goal is to make the visa officer's decision as straightforward as possible by giving them everything they need, exactly how they need it.
Core Identification and Travel Documents
First things first, let's nail down the basics: proving who you are. It sounds simple, but a small mistake here can lead to major delays or even a refusal.
Your most important document is your Nigerian international passport. It absolutely must be valid for the entire time you plan to study in Canada. If your programme is two years long but your passport expires next year, get it renewed before you submit your application. It’s a simple rule: the visa sticker they put in your passport cannot be valid longer than the passport itself.
You'll also need two recent passport-sized photographs. Don't just grab any old picture you have lying around. IRCC has very specific rules about the photo's dimensions, the background colour, and even your facial expression. Get them done professionally to avoid any issues.
Academic Credentials and History
This is where you show the visa officer that you're a serious student with the right background to succeed in your chosen Canadian programme. You'll need to provide clear, high-quality scans of all your educational documents.
- Secondary School Certificates: This is your WAEC or NECO certificate. Make sure you have the official certificate, not just the statement of results. If you have both, it's best to include both to be thorough.
- Transcripts: You need official transcripts from any university, polytechnic, or other post-secondary institution you've attended. These should ideally come directly from your school or be given to you in a sealed envelope to prove they haven't been tampered with.
- Proof of English Proficiency: For most applicants, your IELTS, TOEFL, or PTE test score is non-negotiable. Double-check that your score is still valid on the date you apply.
For a more detailed look at the specific academic requirements IRCC expects, check out our guide on Canada student visa requirements.
Pro Tip on Organisation: Don't just dump your scanned documents into a folder. Name each file clearly and logically. For instance, "Adekunle_Adeboye_WAEC_Certificate.pdf" or "Adekunle_Adeboye_Unilag_Transcript.pdf". This shows professionalism and makes it much easier for the officer reviewing your file online.
Understanding the Current Application Climate
It's crucial to know the environment you're applying in. Recent Canadian policy changes have tightened the screws, making the process more competitive than it was a few years ago.
For context, Nigeria saw a 29% drop in new study permits issued between 2023 and 2024. This isn't just a Nigerian issue; it reflects a broader trend affecting other major student countries due to new student caps and stricter rules.
Despite this, the dream is very much alive. A recent survey showed that 57% of international students hope to apply for permanent residence after their studies. You can explore more data on international student trends at CBIE.ca. What this means for you is simple: your application has to be flawless.
Additional Supporting Documents
Beyond your ID and academic records, you'll need to fill out some specific IRCC forms to complete your file. The main ones are the Application for Study Permit Made Outside of Canada (IMM 1294) and the Family Information Form (IMM 5707).
It's also wise to prepare other documents that strengthen your case. This could be a police clearance certificate to prove you have a clean record or a medical exam report from an IRCC-approved panel physician. While you might not be asked for these upfront, having them ready can save you precious time if IRCC requests them later. Every document you include should help paint a clear picture of a responsible, prepared, and genuine student.
Building a Convincing Proof of Funds
For many Nigerian students dreaming of studying in Canada, the proof of funds requirement is often the biggest hurdle. Let's be frank: this is where a visa officer really zooms in on your application to see if you can genuinely support yourself. Your goal is to paint a financial picture that is crystal clear, legitimate, and leaves absolutely no room for doubt.
IRCC isn't just looking for a specific number in a bank account. They're looking for the story behind that money. Where did it come from? How long has it been sitting there? Is it truly yours to use for tuition and living costs? A massive, unexplained deposit that shows up a week before you apply is a major red flag and almost guarantees extra scrutiny.

What Counts as Acceptable Proof of Funds
The good news is you have several options to prove you can cover your expenses. It's not a one-size-fits-all situation, and you can even combine a few different sources to build a strong case.
Here’s what they typically look for:
- Your Own Savings: If you're funding yourself, you’ll need to provide bank statements for at least the last four to six months. This demonstrates a stable financial history, not just a last-minute loan from Uncle John.
- Sponsorship: This is the most common path for Nigerian students. Your sponsor, usually a parent or a close relative, must provide their own bank statements, a formal letter of sponsorship, and solid proof of their relationship to you (like your birth certificate).
- Guaranteed Investment Certificate (GIC): A GIC is an investment you make with a Canadian bank. As of 2024, the minimum is $20,635 CAD. This is considered gold-standard proof because the money is already secured in Canada, guaranteeing it's ready for your living expenses.
- Scholarships or Financial Aid: Scored a scholarship? Fantastic. You must include the official award letter that clearly states the amount, duration, and terms of the funding.
The Power of a Clean Financial Story
Think of your financial documents as telling a story to the visa officer—and it needs to be a story that’s easy to follow. If your father is sponsoring you and recently sold a piece of land to raise the funds, you absolutely must show the paper trail.
Let's walk through a real-world scenario. Say your dad sells a property for 15 million Naira:
- First, you provide the official Deed of Assignment for the property sale.
- Next, you show his bank statement where that 15 million Naira was deposited.
- Finally, you include a sponsorship letter where he explicitly states that the proceeds from this specific sale are dedicated to your Canadian education.
This creates a transparent, believable narrative. Without this chain of evidence, a large, unexplained deposit just looks suspicious and can easily lead to a refusal. As you build your funds, understanding secure financial instruments is key. For more on this, you might find some useful insights in the best short-term investments for savers.
Key Takeaway: Consistency is everything. The name on the bank account must perfectly match the sponsor's ID. The numbers must add up across all documents. Every large transaction needs a logical explanation backed by solid proof.
Presenting Your Documents Professionally
How you organise your proof is just as important as the documents themselves. Don't just throw a jumble of papers at the visa officer and hope for the best.
Here’s a checklist for a sponsor's documents:
- Sponsorship Letter (Affidavit of Support): This is a sworn statement where your sponsor formally promises to cover your costs.
- Bank Statements: Provide at least four to six months of official, stamped statements.
- Proof of Income: Include their employment letter, recent pay slips, or CAC business registration documents if they are self-employed.
- Proof of Relationship: Your birth certificate is the standard here, clearly showing your relationship to the sponsor.
If you want to do an even deeper dive into crafting the perfect financial profile, check out our guide on how to present proof of funds for Canada. It’s packed with more specific examples. Nailing this part of your application dramatically increases your chances of getting that study visa approved.
Writing a Convincing Statement of Purpose
Your Statement of Purpose (SOP), or letter of explanation, is where your application truly comes to life. It’s your one and only chance to speak directly to the visa officer, to go beyond the documents and numbers, and share your personal story. This letter is the glue that connects everything: your academic background, your chosen programme, your career goals, and—most importantly—your concrete plans to return to Nigeria.
Think of it this way: while your transcripts and certificates show what you’ve done, your SOP explains why. A genuine, well-argued SOP can absolutely be the deciding factor, especially when the competition is stiff.

How to Structure Your Story
A strong SOP isn't just a jumble of ideas; it’s a story with a clear beginning, middle, and end that guides the visa officer through your motivations. You need to connect the dots for them.
Kick things off by introducing yourself and stating the exact programme and university you’ve been accepted into. Then, create a clear link between your past and your future. How did your previous studies or work experience in Nigeria lead you to this specific course in Canada?
Get specific here. Instead of a vague statement like, "I am passionate about technology," try something more compelling: "My three years as a junior web developer at a startup in Ikeja revealed a critical gap in my skills. I saw firsthand how Nigerian e-commerce platforms struggle with data security, which is why I am pursuing the Master of Cybersecurity at the University of Waterloo." This shows real-world motivation.
Looking at examples of compelling statements of purpose can be a great way to see how to structure a powerful argument, even if they're for grants. The goal is the same: to show a clear problem and a logical solution.
Key Takeaway: Your SOP needs to proactively answer the visa officer's silent questions: "Why this programme? Why this school? Why Canada? And why now?" A well-reasoned SOP addresses these points, proving your decision is based on thorough research, not just a whim.
To make sure you cover all the essential bases, here's a breakdown of what your SOP must contain. Think of this as your checklist for crafting a letter that leaves no room for doubt.
Essential Elements of a Strong Statement of Purpose
This table breaks down the key components your Statement of Purpose must include to be effective, with tips for addressing each point.
| Component | What to Include | Pro Tip for Nigerian Applicants |
|---|---|---|
| Academic & Career Background | Briefly explain your educational and professional journey so far. Highlight key achievements or experiences that led you to this point. | Connect your Nigerian experience directly. "My B.Sc. in Biochemistry from UNILAG sparked my interest, but my internship at a local food processing plant showed me the need for advanced quality control." |
| Why This Specific Programme/School? | Detail why you chose this particular course and institution. Mention specific modules, professors, or research facilities that attracted you. | Show you did your homework. "I chose the University of Calgary's M.Eng. in Chemical Engineering specifically for Dr. Ayodele's research in bitumen processing, which has direct applications for Nigeria's oil sector." |
| Why Canada? | Explain why Canada is the ideal country for your studies. Contrast it with other options, including Nigeria, if relevant. | Focus on Canada’s unique strengths in your field, like its advanced research facilities, co-op programmes, or reputation for innovation in your area of study. |
| Future Career Plans in Nigeria | Outline a clear and realistic career path back home. Name potential employers, the role you aspire to, or business plans you have. | Be concrete. "Upon my return, I intend to apply for the role of Project Manager at Julius Berger Nigeria, where my PMP certification and Master's from Canada will be invaluable for their new infrastructure projects." |
| Strong Ties to Nigeria | This is the most crucial part. Detail your economic, family, and social reasons for returning home. This proves your intent to leave Canada after your studies. | Go beyond just mentioning family. Talk about property you own, a family business you will manage, or a confirmed job offer waiting for you. Provide evidence where possible. |
Crafting your SOP with these elements in mind will create a logical, persuasive, and authentic narrative that speaks directly to the visa officer's requirements.
The Make-or-Break Element: Proving Your Ties to Nigeria
Let’s be crystal clear about this: a visa officer's primary concern is ensuring you are a genuine temporary resident. This means they need to be convinced that you will leave Canada once your studies are complete. Your SOP is your best tool to provide this assurance. You absolutely must get this part right.
Devote a good portion of your letter to explaining your strong ties to Nigeria—the compelling reasons that guarantee your return.
- Family Ties: Talk about your immediate family responsibilities. Are you the firstborn child with cultural obligations to your parents? Do you have a spouse and children who are staying behind in Nigeria? These are powerful anchors that visa officers take seriously.
- Economic & Financial Ties: This is where you connect the dots between your Canadian education and your financial future in Nigeria. Do you have a confirmed job offer with a promotion waiting for you? A family business you are set to inherit and modernise? Perhaps you have significant investments, like land or property, in Nigeria. Detail these assets clearly.
- A Solid Post-Graduation Plan: Don't just say you'll "get a better job." Create a detailed roadmap. For instance: "After completing my MSc in Renewable Energy at the University of Alberta, my plan is to return to Nigeria to join [Name of Nigerian Energy Company] in their push to develop sustainable power solutions for off-grid communities, a major focus area for the Nigerian government." This demonstrates foresight and a concrete plan tied to your home country.
By clearly spelling out what you have waiting for you back home, you directly address the visa officer's main reservation and build a huge amount of trust. This is the section of your SOP that can truly seal the deal.
Crossing the Finish Line: Biometrics and Your Final Submission
You’ve done the heavy lifting—your documents are in order, you’ve sorted out your proof of funds, and you've told your story with a strong SOP. Now for the final leg of the race: the technical bits of submitting your application for a study visa to Canada. This part is all about following the process carefully, from uploading your files to the IRCC portal to getting your biometrics done. Let's make sure all your hard work counts.
Once you’ve filled out the online forms and uploaded every last document, the system will direct you to the payment page. Here, you'll pay the study permit application fee, which is $150 CAD, and the biometrics fee of $85 CAD. Make sure you use a credit or debit card that can handle international transactions and, crucially, download and save the payment receipt. It's your official proof of payment.
Shortly after your payment goes through, a Biometric Instruction Letter (BIL) will appear in your IRCC account. This document is your golden ticket for the next step. You absolutely cannot book a biometrics appointment without it, so keep a close eye on your account after you submit.
Securing Your Biometrics Appointment
The BIL is the official notification from IRCC that you need to give your fingerprints and have your photo taken at a designated Visa Application Centre (VAC). For applicants in Nigeria, these centres are managed by VFS Global and are located in cities like Lagos and Abuja.
You have to book your appointment online through the VFS Global Nigeria website. You can't just walk in; they will turn you away. These appointments, especially during the busy student rush periods (think spring and summer), get snapped up fast. So, the moment you get your BIL, book your slot.
When you go for your appointment, you'll need three things:
- Your original Nigerian international passport.
- The Biometric Instruction Letter (BIL) you downloaded from your IRCC account.
- The appointment confirmation letter you received from VFS Global.
The actual process is quick and painless. An official will scan your fingerprints and take a digital photograph. It’s a standard identity verification procedure, so there’s no need to be nervous.
My Advice: Once your biometrics are done, you'll get a stamped receipt. Guard this piece of paper! It’s the only proof you have that you've completed this mandatory step. You can also use the tracking number on it to follow your application's progress.
The image below gives you a general idea of the timeline after you've submitted everything and completed your biometrics.
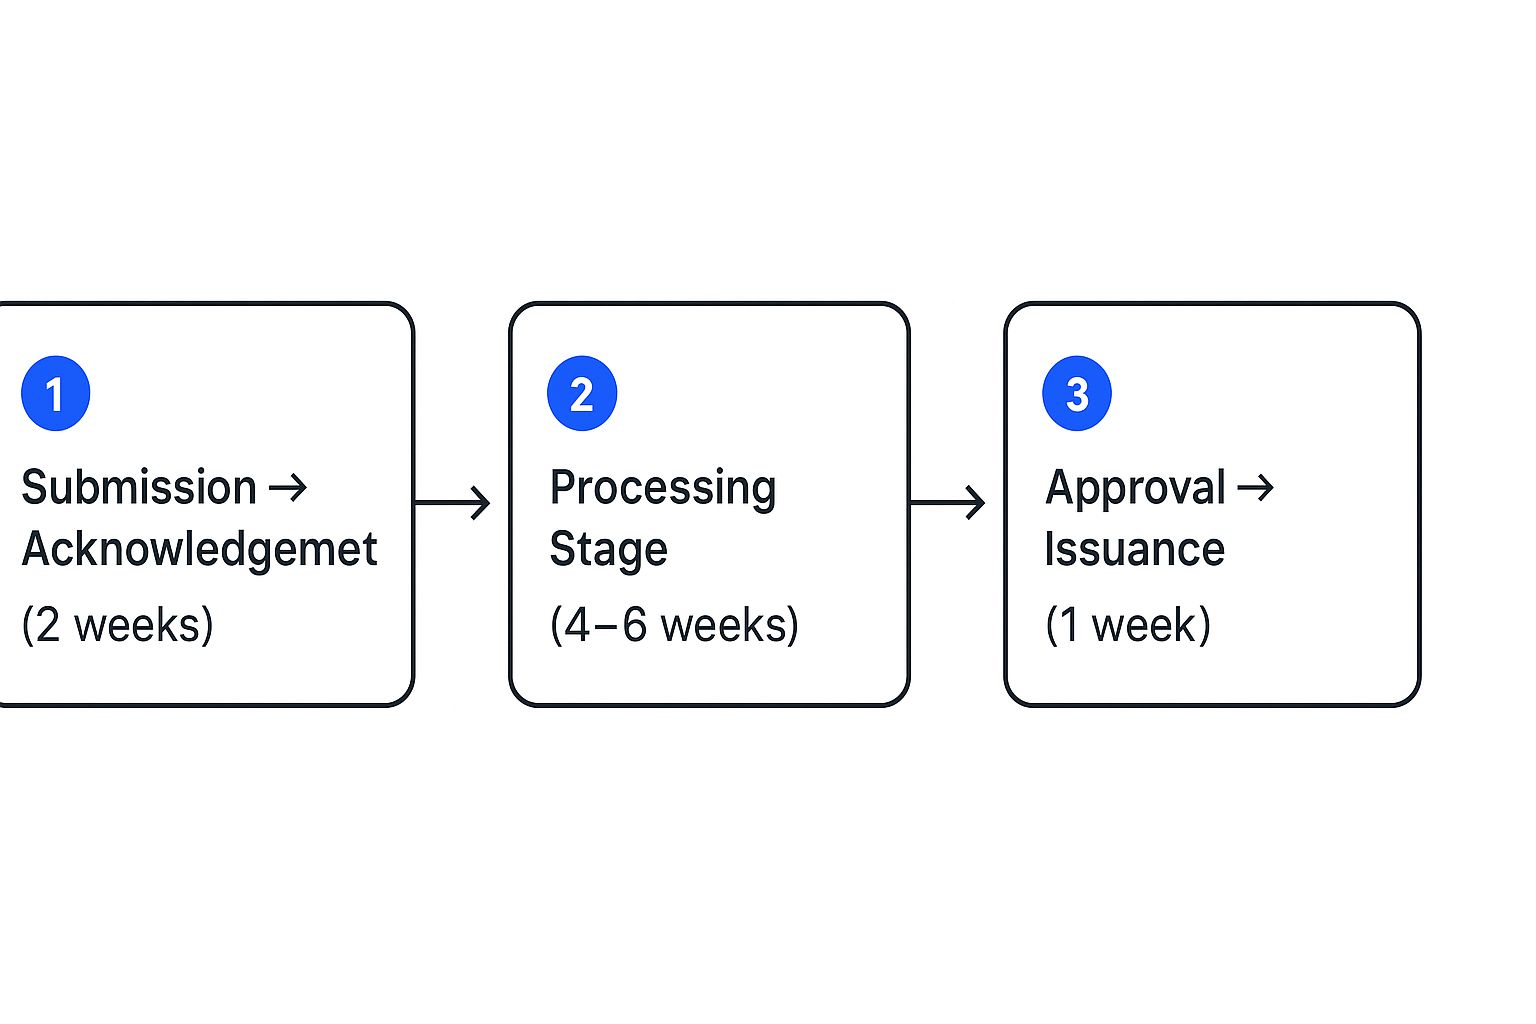
As you can see, you’ll get an initial acknowledgement fairly quickly, but the real review and processing stage is what takes time.
The Waiting Game: Tracking Your Application
With your biometrics submitted, your application is now in the hands of an IRCC visa officer. This is where patience becomes your best friend. You can check the status of your application by logging into your IRCC secure account, but don't expect daily updates.
During this waiting period, be extra vigilant with the email you registered with. IRCC might reach out to request more information or an additional document. A swift and complete response is critical to prevent delays or, worse, a refusal.
For example, a visa officer might have a question about a large deposit in your bank account. They could ask for an updated statement or a formal letter explaining the source of the funds. If you have your documents neatly organised, you can provide this information without any fuss, keeping your application moving forward.
Eventually, the final decision will be posted to your IRCC account. With luck and a well-prepared application, this will be the Passport Request Letter you've been waiting for.
Common Questions from Nigerian Applicants
https://www.youtube.com/embed/GTGSDkjyi58
Navigating the Canadian study visa process from Nigeria always brings up a lot of specific questions and concerns. The stakes are high, and getting clear, direct answers is what you need. Let’s break down some of the most frequent queries we hear from applicants, offering practical insights to help you move forward with confidence.
These aren't just generic FAQs; they’re answers based on the real-world situations Nigerian students run into time and time again.
Can I Work While I Study in Canada?
This is easily one of the most common—and important—questions we get. The short answer is yes, but there are specific rules you absolutely must follow. Most study permits allow you to work up to 20 hours per week during your regular school terms and full-time during scheduled breaks, like the winter and summer holidays.
However, this isn't an automatic right for every single student. To be eligible, you have to be a full-time student at a Designated Learning Institution (DLI) and be enrolled in a programme that leads to a degree, diploma, or certificate. Your study permit will usually state whether you’re allowed to work off-campus. It’s a fantastic opportunity to gain Canadian work experience and help cover some of your living costs.
How Long Does the Application Process Take?
Patience is a virtue here, but planning ahead is even more critical. The processing time for a study visa canada application from Nigeria can vary wildly depending on the volume of applications Immigration, Refugees and Citizenship Canada (IRCC) is handling at any given moment. It can range from just a few weeks to several months.
Because of this unpredictability, it's crucial to apply as early as you possibly can. A safe bet is to submit your complete application at least four to six months before your programme is scheduled to begin. This builds in a much-needed buffer for potential delays, requests for more information, or long processing queues. Always check the official IRCC website for the most current processing time estimates for Nigeria before you apply.
Expert Takeaway: Waiting until the last minute is one of the biggest mistakes you can make. Applying early doesn't just reduce stress; it gives you the time you need to respond properly if the visa office requests additional documents from you.
What Are the Top Reasons for Visa Refusal?
Understanding why other applications have failed is the best way to fortify your own. For Nigerian applicants, refusals often come down to a few common issues that you can—and should—proactively address.
The most frequent reasons for a study visa canada refusal include:
- Weak Proof of Funds: This is a major one. Simply showing the required amount in your account isn't enough. You must prove the legitimate source of that money with a clear, traceable paper trail, as we've discussed. Unexplained large deposits are a huge red flag for visa officers.
- Failure to Prove Intent to Return: The officer must be completely convinced that you will leave Canada after your studies. If your Statement of Purpose is weak on your ties to Nigeria—like family, property, or a solid job offer waiting for you—your application is on shaky ground.
- An Unconvincing Study Plan: Your Statement of Purpose has to clearly articulate why you chose this specific programme in Canada and how it logically connects to your past education and future career goals back home in Nigeria. A vague or generic letter suggests you might not be a genuine student.
A meticulously prepared application that directly tackles these potential weak points is your best defence against a refusal. Every single document should work together to build a strong, credible case that leaves no room for doubt.
Navigating these complexities can feel overwhelming, but you don't have to do it alone. For instant, AI-powered answers to your specific immigration questions, get personalised guidance from JapaChat. Sign up for free and start planning your move with clarity.
Leave a Reply